A Wiki does not have pages as such. But as a very rough guide, expect to produce something the equivalent of about six printed pages (although you can invoke pop-ups and the like which make a page count only very approximate). Use graphics reasonably sparingly, and to the point.
Why Wiki?
Since everyone is used to using Microsoft Word, why do we use a Wiki for this course? Well, the Wiki format has several advantages.
A full revision and fully dated history across sessions is kept (Word only keeps this during a session). This is more suited for laboratory work, where you indeed might need to go back to a particular day and experiment to check your notes.
The (chemistry) Wiki allows you to include molecule coordinates, vibrations and MO surfaces which can be rotated and inspected, along with other chemical extensions. Word does not offer this.
The Wiki allows you to include "zoomable" graphics in the form of SVG (which Gaussview generates), and access to the 17-million large WikiCommons image library, as well as access to the Wikipedia InterWiki.
The template concept allows pre-formated entry. There are lots of powerful chemical templates available.
Autonumbered referencing, and particularly cross-referencing, is actually easier than using Word.
You (and the graders) can access your report anywhere online, it is not held on a local hard drive which you may not have immediate access to.
It has automatic date and identity stamps for ALL components, which means we can assess that part of the report handed in by any deadline, and deal separately with anything which has a date-stamp past a given deadline. A Word document has only a single date-and-time stamp and so deadlines must apply to the whole document.
And we have been using Wikis for course work since 2006, so there is lots of expertise around!
And finally, Wiki is an example of a MarkDown language, one designed to facilitate writing using an easy-to-read, easy-to-write plain text format (with the option of converting it to structurally valid XHTML).
Report Preparation
Before you start writing
Before you start writing, you might wish to read this article[1] (or perchance this advice[2]). In your report you should discuss your evaluation of each of the techniques you use here. You should include at least three literature references in addition to the ones given here. You might also want to check the late breaking news to see if there are any helpful hints about the project you might want to refer to. You will be writing your report in Wiki format, and it is best to do this continually as you do the experiment. In effect, your Wiki report is also your laboratory manual.
WikED editorOpen Firefox as a Web browser.
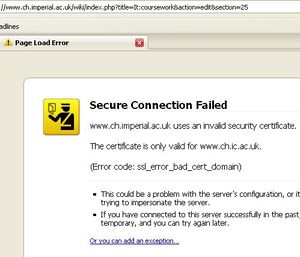
There should be a tab for the course Wiki, but if not, use the URL www.ch.ic.ac.uk
Security exceptionIf the browser asks you to add a security exception, do so and proceed to view/confirm the certificate.
You can view the Wiki without logging in, but to create a report, you will have to login as yourself. Check Remember my login on this computer
Before you start, you might want to visit the preferences page to customise the Wiki for yourself.
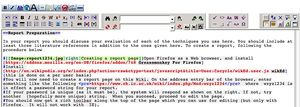
Follow the procedures below. Check that the WikED icon is present at the top, just to the right of the log out text (ringed in red). If you want a minimalist editing interface, click this icon to switch it off. A cheatsheet summarises the commands with a playpen for playing. You can write your report by simply typing the appropriate text as shown in the cheatsheet, or by using the WikEd buttons in Word-style composition.
Assigning your report an identifier
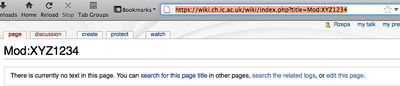
Creating a report page In the address box, type something like
wiki.ch.ic.ac.uk/wiki/index.php?title=Mod:XYZ1234
The characters Mod indicate a report associated with the modelling course, and XYZ1234
is your secret password for the report. It can be any length, but do not make it too long! It should then tell you there is no text in this page. If not, try another more unique password. You should now click on the edit this page link to start. Use a different address for each module of the course you are submitting.
It is a good idea
to add a bookmark to this page, so that you can go back to it quickly.
Assigning your report a persistent (DOI-style) identifier.
Use this tool to assign a shorter identifier for your report (one that can be invoked using eg {{DOI|shortidentifier]].
Converters to the Wiki format
Convert a Word document. Open it in OpenOffice (rather than the Microsoft version) and export as Mediawiki. Open the resulting .txt file in eg WordPad, select all the text, copy, and then paste this into the Wiki editing page. You will still have to upload the graphical images from the original Word document separately.
There is also a HTML to Wiki converter which you can use to import HTML code from an existing Web page into a (Media)Wiki.
A cheatsheet summarises the commands with a playpen for playing. You can write your report by simply typing the appropriate text as shown in the cheatsheet, or by using the WikEd buttons in Word-style composition.
The editing environmentYou will need to create a separate report page on this Wiki for each module of the course. Keep its location private (i.e. do not share the URL with others).
The WikED toolbar along the top of the page has a number of tools for:
adding citation references,
superscript and subscripting (the H2O WikEd symbol will automatically do this for a formula),
creating tables
adding links (Wiki links are internal, External links do what they say on the tin)
local to the wiki, as [[mod:writeup|text of link]]
remote, as [http://www.webelements.com/ text of link]
Interwiki, as [[w:Mauveine|Mauveine]]
DOI links are invoked using the DOI template {{DOI|..the doi string ..}} or the more modern form [[doi:..the dpi string..]]
Links to an Acrobat file you have previously uploaded to the Wiki can be invoked using this template: {{Pdf|tables_for_group_theory.pdf|...description of link ...}}
There are lots of other templates to make your life easier such as the ChemBox
If you need some help, invoke it from the left hand side of this page.
Upload all graphics files also with unique names (so that they do not conflict with other people's names). If you are asked to replace an image, REFUSE since you are likely to be over-writing someone else's image!
Invoke such an uploaded file as [[image:nameoffile.jpg|right|200px|Caption]]
We support WikiComons, whereby images from the content (of ~10 million files) from Wikimedia Commons Library can be referenced for your own document. If there is a name conflict, then the local version will be used before the Wiki Commons one.
Invoke the top menu, use this file in a Wiki, and copy the string it gives you into your Wiki page
[[File:Armstrong Edward centric benzene.jpg|thumb|Armstrong Edward centric benzene]]
Colour can be added (sparingly) using this text fontcolor
template. (invoked as {{fontcolor1|yellow|black|text fontcolor}} )
Save and preview constantly (this makes a new version, which you can always revert to). It goes without saying that you should not reference this page from any other page, or indeed tell anyone else its name.
Important: Every 1-2 hours, you might also want to make a backup of your report. This is particularly important when adding Jmol material, since any error in the pasted code can result in XML errors. The current Wiki version does not flag these errors properly, but instead just hangs the page. Whilst you can try to repair the page as described below, it is much safer to also have a backup!
You should get into the habit of recording results, and appropriate discussion, soon after they are available, in the manner of a laboratory note book.
More Editing features
Handling References/citations with a DOI
This section shows how literature citations[3] can be added to text[4] using the {{DOI|value}} (digital object identifier) template to produce a nice effect. Citations can be easily added from the WikED toolbar.
The following text is added to the wiki, exactly as shown here: <ref name="ja9825332">W. T. Klooster , T. F. Koetzle , P. E. M. Siegbahn , T. B. Richardson , and R. H. Crabtree, "Study of the N-H···H-B Dihydrogen Bond Including the Crystal Structure of BH<sub>3</sub>NH<sub>3</sub> by Neutron Diffraction", ''J. Am. Chem. Soc.'', '''1999''', ''121'', 6337–6343.{{DOI|10.1021/ja9825332}}</ref>
Giving a reference a unique identifier, such as <ref name="ja9825332"> allows you to refer to the same footnote again by using a ref tag with the same name. The text inside the second tag doesn't matter, because the text already exists in the first reference. You can either copy the whole footnote, or you can use a terminated empty ref tag that looks like this: <ref name="ja9825332" />.
Collected citations will appear below wherever you place the <references /> tag, as here. If you forget to include this tag, the references will not appear!
Including the DOI for your experiment data
The datasets associated with your experiment can be given a DOI by publishing any entry in the SCAN Portal. You can include this DOI as a normal citation.[4]
Additional citation handling
A macro-based reference formatting program has been developed in Microsoft Excel to not only produce the wiki code for direct pasting into your report, but that also formats text for placing in documents, such as synthesis lab reports. This program is available here.
A Cite journal template is installed for anyone who wants to experiment
↑R. Murray, "Skillful writing of an awful research paper", Anal. Chem., 2011, 83, 633. DOI:10.1021/ac2000169
↑W. T. Klooster , T. F. Koetzle , P. E. M. Siegbahn , T. B. Richardson , and R. H. Crabtree, "Study of the N-H···H-B Dihydrogen Bond Including the Crystal Structure of BH3NH3 by Neutron Diffraction", J. Am. Chem. Soc., 1999, 121, 6337–6343. DOI:10.1021/ja9825332
Wiki Edit for IOS allows a Wiki to be edited using an iPad. You can dictate your text using Siri if your speed at thumb-typing is not what it should be.
Bringing your report to life
Basic JSmol
You can use coordinate files created as part of your work (in CML or Molfile format) to insert rotating molecules for your page.
Using your graphical program (ChemBio3D or Gaussview), save your molecule as an MDL File, which has the extension .mol, or as chemical markup language, which has the extension .cml.
Or, if your calculation ran on the SCAN batch system, publish the calculation, and in the resulting deposited space, download the .cml or the logfile.out file to be found there (the latter should be used for vibrations only).
On the Wiki, Upload File (from the left hand panel) and select the molecule file you have just placed on your hard drive as above.
On your Wiki page, insert <jmolFile text="Explanatory text for link">BCl3-09.log</jmolFile> where in this example, BCl3-09.log is the just uploaded file.
The should produce this link. When clicked, it will open up a separate floating window for your molecule.
Further actions upon the loaded molecule (such as selecting a vibrational mode and animating the vibration) are done by right-mouse clicking in the Jmol window.
When using animations, please let them pop up in a separate window using the <jmolAppletButton> function. Your browser won't slow down and you will make your life so much simpler. =)
Read more on how to do that here . --Rea12 20:58, 8 September 2014 (BST)
Advanced JSmol
A much more powerful invocation is as follows. The following allows a molecule to be directly embedded into the report, and it also shows how to put a script in to control the final display.
copy/paste either of the two sections below into your own Wiki
<jmol>
<jmolApplet>
<title>Pentahelicene</title><color>white</color>
<size>150</size><script>zoom 5;moveto 4 0 2 0 90 120;spin 2;</script>
<uploadedFileContents>yourmolecule.cml</uploadedFileContents>
</jmolApplet>
</jmol>
<!-- Above code relates to the first molecule display you can see -->
<!-- Code below relates to the second molecule display you can see -->
<jmol>
 <jmolApplet>
  <title>Vibration</title><color>white</color><size>200</size>
   <script>frame 8;vectors 4;vectors scale 5.0;color vectors red;vibration 10;
  </script><uploadedFileContents>BCl3-09.log</uploadedFileContents>
 </jmolApplet>
</jmol>
First molecule (if you see yellow below, then check the late breaking news)
Pentahelicene
Second molecule (if you see yellow below, then check the late breaking news)
Vibration
Every time you embed a molecule in a Wiki page in the above manner, the Web browser must set aside memory. Too many molecules, and the memory starts to run out, and the browser may slow down significantly. So use the feature sparingly, only including key examples where some structural feature would benefit from the rotational capabilities.
It is possible to add many other commands to the JSmol container above. For example, <script>select atomno=3,atomno=4,atomno=5; color purple;measure 3 5;measure 5 4;</script> will colour atoms 3 4 and 5 (obtained by mouse-overs) purple, and then measure the length of the 3-5 bond. Further examples of how to invoke Jmol are found here, and a comprehensive list given here.
When complete, select Formatted checkpoint file from the output files and download
Double click on the file to load into Gaussview
To generate a molecule orbital, Edit/MOs and select (= yellow) your required orbitals.
Visualise and Update to generate them
To generate an electrostatic potential, Results/Surfaces and Contours, then Cube Actions/New Cube/Type=ESP. This will take 2-3 minutes to generate
In Surfaces available pre-set the Density to 0.02 and then Surface Actions/New Surface. Try experimenting with the value of Density for the best result. Save the cube as per below.
In Results/Surfaces and contours from the cubes available list, select one and Cube actions/save cube
Invoke this page and you will be asked to select your cube file,
followed by three file save dialogs, one for the coordinates (.xyz), one for the MO surface (.jvxl) and a shrink-wrapped bundle (.pngj).
Insert the following code into your Wiki, replacing the file name with your own choice from the preceding file save dialogs.
Next, upload these two files into the Wiki (one file at a time, the multiple file uploader does not seem to work for this task)
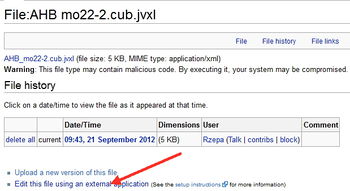
Now for the tough bit. You will need to find the absolute path for the .jvxl file. Above, this appears as images/1/1b/AHB_mo22-2.cub.jvxl
Just after uploading a .jvxl file, you will see a response as shown on the right.
Right click on Edit this file using an external application. You can used any text editor (Wordpad etc).
This text file will contain something like: ; or go to the URL https://wiki.ch.ic.ac.uk/wiki/images/1/1b/AHB_mo22-2.cub.jvxl
Select just the string images/1/1b/AHB_mo22-2.cub.jvxl and paste it in as shown above:
You should get something akin to:
Orbital
You can superimpose two surfaces. Change the script contents above to append a second surface to the first:
<script>isosurface color orange purple "images/4/42/AHB_mo22.jvxl" translucent;isosurface append color red blue "images/1/1b/AHB_mo22-2.cub.jvxl" translucent;</script>
The four colours used in this line can be changed to whatever you consider appropriate.
An alternative way of loading surfaces
This method avoids the need to specify paths to files as seen above. Instead uses the .pngj bundle which contains all necessary information and can be invoked by
<jmolFile text="just a link">CF3_mo30.cub.pngj</jmolFile>
It only supports one surface (you cannot superimpose two orbitals)
You can also load other surfaces, such as molecular electrostatic potentials generated from a cube of electrostatic potential (ESP) values created using Gaussview as follows:
Download .fchk file from SCAN
Open using Gaussview
Results/Surfaces & contours/Cube actions/New Cube/ESP and then cube actions/save cube which is how the above was generated. You may have to play around with the value of the density (~0.02).
MOPAC orbitals
Run MOPAC from ChemBio3D, selecting Compute Properties/Molecular Surface from the properties pane, and in the General pane specify a location for the output and deselect Kill temporary files if not already so.
Upload the .mgf file so produced to the Wiki
Invoke as follows (MO 35; means the 35th most stable orbital for that molecule).
You may have need to express some equations on the Wiki. This is currently supported only using a notation derived from LaTeX, and as with the Jmol insertion above, is enabled within a <math>\frac{-b\pm \sqrt{b^{2}-4ac}}{2a}</math> field inserted using the default editor (the SQRT(n) button), and producing the following effect:
The requisite syntax can be produced by using
MathType as an equation editor (used standalone or in Word). It places the required LaTeX onto the clipboard for pasting into the Wiki).
A more general solution to this problem is simply to create a graphical image of your equation, and insert that instead as a picture.
Inserting Tables
Instead of inserting screenshots of Excel, tables can be produced using MediaWiki markup (see this page), where you can also find lots of examples of different styles of table. However, this can be quite time consuming when you have a lot of tabulated data and need to copy it from somewhere like Excel into ChemWiki. Instead of typing it by hand, you can save your Excel worksheet as a comma separated file (.csv) and then use this [CSV to MediaWiki markup] convertor. Note that cells starting with "-", e.g. for negative numbers, need a space inserted between the - and | in the output otherwise MediaWiki interprets it as a new row.
Another web-based utility is available called Excel2Wiki which can be used to generate MediaWiki code from an Excel table.
SVG (for display of IR/NMR/Chiroptical Spectra)
SVG
SVG stands for scaleable-vector-graphics. Its advantage is well, that it scales properly (but it has many others, including the ability to make simple edit to captions etc using Wordpad or similar). From your point of view, it is readily generated using Gaussview. If you view an IR/NMR/UV-vis/IRC/Scan/ spectrum in this program, it allows you to export the spectrum as SVG (right-mouse-click on the spectrum to pull down the required menu). Upload this file, and invoke it as [[File:IR.svg|200px|right|SVG]] If you open eg IR.svg in Wordpad (or other text editor), you can edit the captions, font sizes etc (its fairly obvious). Oh, you will need to use a web browser that actually displays SVG. Internet Explorer 8 does not (9 is supposed to). Use Firefox/Chrome/Safari etc.
Chemical Templates
An example is the ChemBox. Volunteers needed to test/extend these!
Backing up your report
Invoke this utility to back your project up. In the box provided, enter e.g. Mod:wzyz1234 being the password for your report. This will generate a page (right) which can be saved using the Firefox File/Save_Page_as menu. Specify Web Page, XML only as the format, and add .xml to the file suffix. You might want to do this eg on a daily basis to secure against corruption. This is in addition to the notes for how to repair broken pages.
We have had instances of people inserting a corrupted version of the Jmol lines into their project, resulting in a XML error or Database error. Recovering from such an error is not simple. So we do ask that you carefully check what you are pasting into the Wiki, and that its form is exactly as shown above. For example, below is a real example of inducing such an error. Can you see where the fault lies? (Answer: the <jmol> tag is not matched by </jmol>. If tags are not balanced, XML errors will occur).
Another example might be wish to indicate a citation using <ref>...details </ref> but in fact end up entering <ref> ... (i.e. missing out the </ref>)
If you do encounter such an error, try invoking your project as https://www.ch.ic.ac.uk/wiki/index.php?title=Mod:wzyz1234&action=history and edit and then save an uncorrupted version. You will need to be already logged in before you attempt to view the history in this way, since logging in after you invoke the above will return you not to the history, but to the corrupted page (Hint: it sometimes helps to check Remember my login on this computer as you log in). For example, the history for this page can be seen here. You can eg load this preceeding page, and then use it to replace writeup with your own project address.
If the preceeding does not work try the instructions shown here.
Feedback
Each Wiki page has a discussion section, including your submitted report page.