The below is split into three parts for convenience. Please use these only as an approximate guide.
Laboratory Objectives
To gain experience in the use of specific programs useful to chemistry such as
Word (either the Microsoft version or an Open version) in combination with the EndNote bibliographic database to write laboratory reports and essays
The Chemdraw chemical structure drawing program
Various Web-based bibliographic chemistry search systems
Various dedicated programs for chemical structure searching
To learn how to recognize and perhaps even cope with "bugs". You will encounter (unfortunately) several in this lab, and we have suggested "workarounds". [Bugs and other oddities are explained in square brackets where we know about them. If you discover your own, please let us know].
To gain experience of different data formats used for expressing chemical information, and how to interconvert them, and use them in populating Wiki pages
To apply the above skills to doing a comprehensive literature search on the moleculePenicillin, a reaction (its conversion to Cephalosporin), its properties, both physical (spectroscopic) and biological, and how to create e.g a Word document organising these themes.
The Computer lab is free during Wednesday mornings for tutorial groups, as arranged with your organic tutor. Outside of these times you can also use the computers located in the study area and you have access to 24 hour opening in the central library, although you may find not all of the chemistry-related programs will be available there.
Start by checking that your login still works. You will use some chemistry specific programs you might not have come across in first year.
Software for your own computer
The department has a Site License for a program system called ChemBio3D, the terms of which allow individual undergraduates to acquire a copy of the program and to install it on their personal computer. The license is an annual one.
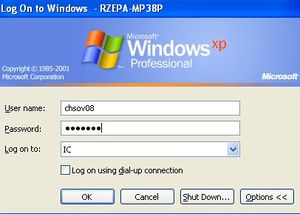
login windowLog-in. There is one important different between using a home computer and the ones here; you need to authenticate your session with the password issued to you at registration. Check the login window looks as shown on the right, and proceed to login.
Document homePerhaps the single most confusing aspect for most people is what the Home icon (left) means. So let's sort this out immediately. You are working in an enterprise environment, where a fast network connects each computer to a central area for storing files. When you log in, you are granted access to your files, and on the computer desktop, the Home icon means "the directory where the folders and documents associated specifically with the login account are stored". This is because all computers work on the metaphor of a filing system with hierarchies. Home is the top of your personal file system! If you double click this icon, you should see YOUR files. Check this! If you get lost navigating the hierarchical directories, "Home" is always a useful way of restoring a sense of orientation. Home also has a synonym, called "My Documents", which the operating system can sometimes display instead of Home.
Start FirefoxStart the FireFox web browser using the icon on the desktop. [Why not Internet Explorer (IE)? Well, it handles some of the chemical stuff more delicately than Firefox, and we find it a tad more reliable]. You will discover another "home" Firefox home. This means "the Web page designated as the starting point for Web navigation in the College/Department", in other words a quite different meaning to the previous home! Open the Web URL http://www.ch.ic.ac.uk/wiki/ It should be listed in the Bookmarks menu and in the tabbed menu along the top of the browser window. [Of course, this instruction might strike you as pointless, since if you are reading this, you will have already opened up a browser at this page!].
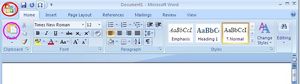
Office 2007Subs and SuperscriptsEndNote tabStart Microsoft Office 2007. The basic (Home) Word document work area is shown to the in the thumnail to the right (click to expand it) and you should familiarise yourself with some of the palettes. This version of the program is somewhat different from earlier versions you may already be familiar with, such as Office 2003. In particular, open/save/print dialogs are now to be found by pressing on the Icon highlighted here with a red circle. Copy/past operations are invoked using the icon encircled in purple. Other common operations are found to the right of these two in the taskbar, including the chemically useful subscript and superscripts (right diagram). Note also the the default document saves invokes the new .docx format, which is an XML-based type with much interesting informatics potential. If you intend sending a document to someone who is still using Word 2003 or earlier, you should instead save your document in the older .doc format (although .doc to .docx converters are available). You can also save as PDF, which is useful for project/report submission.
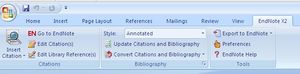
Insert tabThere are two other task-bars you will find useful. the Insert bar inserts a variety of other content, including pictures, tables and the like. The EndNote tab invokes a citation and reference manager, which you will use as described below (Important: If the Endnote ribbon does not show, do the following; 1. Go to Programs/Additional Programs/EndNote/Configure EndNote. 2. Run this script, whereupon the EndNote ribbon should appear in Word 2007).
Practice copying text from the Firefox Browser Window to the Word document. You can do this using the Copy/Paste metaphor, or you can try the drag-n-drop mode. You will notice that whilst the text itself comes over, any formatting associated with this text (size, colour, weight etc) might not. You may also get more than you bargained for (i.e. hidden browser instructions etc.) [This copy is a one-way operation, since the FireFox window is "read-only"].
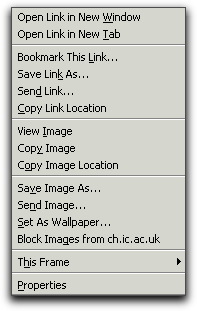
Save Firefox imageImages are special when it comes to copying. Proceed as follows:
Find an image in the browser you wish to copy, and with the cursor over the top, right click (Windows) to get a menu that looks like the one on the right:
If one of the options is Copy image, select it. Not all browsers support this, in which case instead invoke save this image as and save it in an appropriate directory (A suitable sub-directory of Home on Windows).
With an Office Word window open, paste the image (if you copied it) or Insert/Picture/from file (if you saved it). The image will come over as its "real size". Word will allow you to rescale it, by dragging the bottom right corner of the image. Observe carefully what happens if you resize it to be larger as well as smaller.
Do remember how to change between windows (the technical term is that the active window is said to be on focus) by selecting the required window from its icon shown on the task bar/dock at the bottom of the screen.
Pentahelicene
Not everything is always "copyable". Some apparent images are in fact produced by an "applet" embedded in the browser. This includes most conspicuously chemical diagrams, such as may often be found on these course notes. Here a copy or a save operation may not produce the effect you desire.
finding files Practice naming and saving document files to your Home (Drive H: on Windows) or a removable medium such as a FlashDrive.
Practice finding files and documents from these various locations. [It frequently happens that they do not get saved where you think, and finding such lost files is skill you need to acquire rapidly!] Note however that finding content of files may be very slow. Windows Desktop Search is NOT activated on College systems.
Chemdraw introduction
TaxolStarting and using ChemDraw. If you click on the Chemdraw icon in the toolbar of these notes at the top (second along) you will start Chemdraw as a separate program. Practice by drawing Taxol. You many need a few hints and tips, and the demonstrators should be able to help you with this. Its easier than trying to describe the technique here (don't worry, everyone picks up Chemdraw by watching others use it!).
Check that you have drawn it correctly by calculating its formula. To do this, Go to View/Show analysis window and record what you see. Then repeat the procedure by clicking on the image of Taxol above to get a "one I did earlier" copy (it should give you C47H51NO14. Mol. Weight 853.91). Do you get the same values as the pre-recorded one? If you do not, you will have to try to find where the discrepancy is. Remember, if you cannot draw a structure reliably, you will not be able to search for it reliably.Using the ChemDraw application, select copy/paste the structure into a Microsoft Word window. Practice editing the structure inside the Word processor by double clicking its diagram. Practice re-scaling the ChemDraw diagram either within Word or within Chemdraw. Scaling is normally done by pointing the cursor at the bottom right hand corner (it should change shape at this point) and then "dragging" inwards or outwards to change the size. Try copying instead the Web picture (GIF format) from this Web page to Word. Put side by side with the picture of the same molecule derived from ChemDraw and experiment with scaling both. What is the difference in behaviour?
Practice creating a .zip Archive of two or more files using WinZip (Windows). Windows users will have to open WinZip.exe from the Start/Program files menu, create a new archive, and drag-n-drop items into it and then save to create the archive.
Email and Security: Digital Certificates
Signing an Email
This is a mechanism whereby an email or a Word document (also Acrobat) can be digitally signed to ensure it has not changed since signed, that it truly comes from the signer, and has a clear time stamp associated with it. A Imperial College digital certificate is automatically issued to you when you log in.
To send a signed (i.e. trusted) email, open up Outlook 2007 and from Tools/Trust Centre/E-mail security check the Add digital signature to outgoing messages button. You need only do this once, and all subsequent emails will be signed.
Whilst you are in this panel, also click on Settings, and from there Choose a Signing Certificate. Only one should be on offer (if none is, then the auto-enrollment mechanism has not worked, and you need to contact Professor Rzepa). Select it, and close the Change security settings box.
Next, click on Publish to GAL. This publishes your certificate so that others can find it (they would need your certificate if they wish to send you an encrypted (as opposed to signed) email. It make take up to 30 minutes for your certificate to become searchable.
When you compose a new message, a Sign button will appear in the taskbar (on the far right hand side, red circle, right) which you can select/deselect as appropriate.
Search for other people's certificates here. If you have in your possesion your own certificate and another person's certificate (the public key thereof) you can go one step further than signing, and proceed to encrypting either the email, or the document, or both. Only you and the person whose certificate you have included will be able to read the resulting email/document.
An alternative to using Outlook is the Web interface (using Internet Explorer and URL: https://icex.imperial.ac.uk/Exchange/ ). Go to Options and thence E-Mail Security. You will be asked to download an S/MIME control. If you are using your own machine, you can install this. Currently, this installation is not possible on College machines (but watch this space).
Signing a Word Document
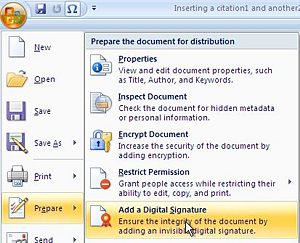
To sign a word document, create it, then from The top left icon, Prepare/Add a digital Signature. Close the panels and save the document. You need to do this for each document you wish to sign.
Yo can combine the two operations, i.e. sign a document and then sign the email you use to send it to someone. You may be asked to use this combination when submitting course work to laboratory supervisors.
Setting up E-mail, sending a document as an attachment (to yourself) and good e-mail housekeeping and etiquette. Create an archive of files (see above), and email it to yourself or a friend, and check you can unpack and read the archive.
Second Session: Internet search portals using a Web browser (~2D)
You will be expected to use the information sources below to find out as much as you can about penicillin and its conversion to cephalosporin. If you wish something new, try vancomycin instead (or your favourite antibiotic!). From the following sources, copy text as appropriate into a Word document.
Google Internet based search portals. Also one by Microsoft or SciRus. Note that these are the advanced search interfaces, not the default ones. Whilst you are at it, try running them with some Boolean operators.9
The above sources do not allow you to save the information in proper "bibliographic" format and you have to copy/paste instead. A much better way is to save "structured data" to a disk file and to use this to populate a proper database. The next two sources do allow this, and the rest of this lab session will be devoted to practicing how to do this.
Web-of-Science and EndNote
A Web of Science Search
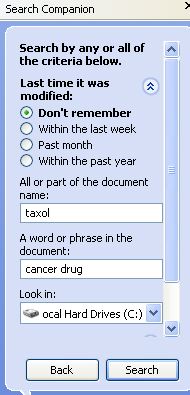
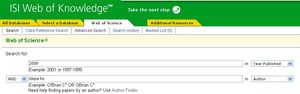
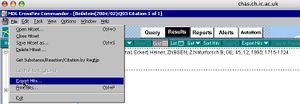
WoS seaerchsaving a list for Endnote The Web-of-Science and the Science Citation Index database. Use the normal search option. There will be an abundance of citations for penicillin and cephalosporin. See if you can prune these down with a more elaborate search perhaps, using some of the Boolean logic shown in the lectures. You can also try checking on the number of articles members of our staff (or your tutors) published in 2008, and then export these to EndNote. Who is our most published chemist in the dept. in that year? If you have a set of references produced, mark the individual ones you want to keep (or mark the entire set by scrolling down to the bottom of the list of found articles and tick the all records on page button), and then press the Save to EndNote button at the bottom. Keep the file that is produced (it may appear with the name uml_view.cgi on the desktop) or you can open it directly with EndNote (see below).
Explore button/Research topic, try searching for the Topic "Conversion of penicillin to cephalosporin" and see what the result is (~9 references). Save these citations using the file type "tagged" format. To do this, you will need to navigate to drive H: to save your file, since the default location is not helpful.
Inserting the citations just found into Word
Starting EndNoteFrom Word 2007, start up EndNote on your computer. It will need initial configuration the first time you open it. Create a new bibliographic library and save it to your H: drive or Documents area. Via Edit/preferences select to load this database upon startup, thus dispensing with subsequent startup dialogs (it will in fact default to opening the most recently used library). From Edit/Output style/Open Style Mananger, select the tick-box against a template known as Royal Society of Chemistry (you may have to use Find by/Chemistry to locate it). From now on, always check that this style is correctly set when you open EndNote.
From File/Import of EndNote define the Import Option (ISI-CE in the pull down menu, or Other Filters/SciFinder (CAS) if importing SciFinder Scholar) and import any saved datasets you created earlier from WOS or SciFinder.
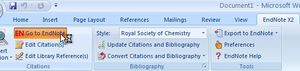
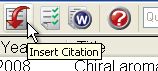
Go back to Word 2007, and write some text. At an appropriate point, from the Endnote X2 taskbar tab, press Go to EndNote when your library should be revealed (in this case containing the references you have just imported). Select the one you want to insert, and press the Insert citation tab. If everything has been set up correctly, Word should insert your desired reference from your bibliographic database, formatted according to the RSC guidelines. If you rearrange the order in which the references appear in the text by cutting/pasting, the numbering at the bottom should change accordingly. If you delete a reference, it should disappear from the numbered list.
Sigma-Aldrich Catalogues and MSDS (Safety) information
The Aldrich catalogues can be searched for compounds and their MSDS safety sheets. Useful for completing COSHH forms.
A SciFinder search instead
The Scifinder Scholar system is available via an icon on the desktop [Be aware the College only has five concurrent licenses. During a full lab, only the first five lucky users will be able to connect]. From the Explore button/Research topic, try searching for the Topic "Conversion of penicillin to cephalosporin" and see what the result is (~9 references). Save these citations using the file type "tagged" format. To do this, you will need to navigate to drive H: to save your file, since the default location is not helpful.
Structure searching using Pubchem/eMolecules/Dictionary of Organic Compounds
Search the eMolecules database using a SMILES string generated from Chemdraw ( O=C1C([N])C2N1CC(C)(C)S2=O ). Go to the Search from a list box, by pressing the Enter a list button. From the pull-down menu, select SMILES and into the list box, paste O=C1C([N])C2N1CC(C)(C)S2=O and finally tick the Search as substructure box. You should get around 35 hits, and you can explore the properties. Note that you will not be able to view spectroscopic properties without a (paid) account!
Search the PubChem database using a SMILES string generated from Chemdraw ( O=C1C([N])C2N1CC(C)(C)S2=O ). Select the substructure/superstructure or the Identity/Similarity option, and then the CID, SMILES, InChI tab, and past in the string O=C1C([N])C2N1CC(C)(C)S2=O . Select 80% similar if using the Similarity option (63 hits). Again, explore the properties associated with each hit.
Third Session (~3D)
Converting a 2D structure definition to a 3D set of coordinates
Under options, paste the SMILES string, enter a name, and select 3D structure viewer automatically loaded.
Click on Generate 3D structure. A window appears, and after about 20-30 seconds, a structure does as well. At the bottom, click on "Click to download this structure in PDB file format", whereupon a full window diagram appears. Save the molecule as above.4
Property searching using Beilstein Crossfire
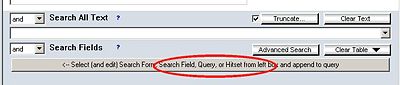
Crossfire searchselection of physical propertiesGet all related citationsExport hitsSelect EndNoteA tutorial on using Crossfire is available, including one on exporting data. Click on the Beilstein icon on the desktop, and at the login prompt, enter xfire as the ID and mimas as the password. Once in, try a Beilstein Crossfire molecule property search. Click on the Search Field query, which will expand as shown on the right.
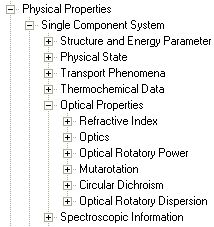
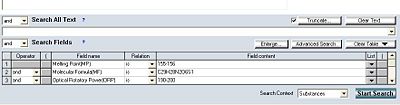
Try entering the following three properties which comprise MP is 155-156 and MF is C29H28N2O6S1 and ORP is 190-200. This means in effect, show me ANY molecule which melts at a certain temperature (determined using a melting point apparatus), which has a molecular formula (determined using mass spectrometry) and an optical rotatory power between certain values (determined using a polarimeter). There are about 500 properties which you could specify in this manner. To explore them, expand the index on the lhs of the application window by clicking on any one + sign. A double click on the one you wish to invoke will populate the search box with that term. This type of technique is useful for identifying an unknown compound purely from its physical properties.
Once you have a hit set, you must invoke:
Task/Get all related citations
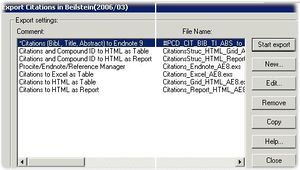
File/Export hits
Export citations to EndNote
Use the Import Filter Reference Manager (RIS) filter in Endnote to import these hits.
Structure searching using Beilstein Crossfire
This part of the lab will allow you to do a structure search using Crossfire. Firstly make sure you are running the Crossfire structure editor (set from Options/Structure editor) rather than ISIS Draw (which may be the default).
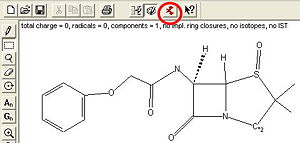
Double click on the top window corresponding to the structure editor, and using this draw the molecule seen to the right. To change the atom type, click on an atom, and type in the atom symbol appropriate. For the specific case of the atom labelled as C*2 on the rhs, also set the number of free valence sites to 2.
When complete, click on the little red icon in the editor window, to register the search, followed by clicking on the start search button. You should get in the region of 111 hits for the molecule shown here.
Click on view to start listing the hits. The structure as drawn by you is highlighted in red; wild-card atoms or groups are shown in black. Double click on any one of the structures to reveal its known properties.
Click on a selected properties to reveal its reported value(s). You will also see a link entitled Original document via LinkFinderPlus which should in due course take you directly to the journal article in which the property was reported.
You can cycle through the hits by selecting the forward (or back) buttons to be found on the top right of the Crossfire program.
If you define a structure without any free valence sites, you can select Autonom from the tab bar along the top. This will automatically name the compound you have drawn, including all chiral carbon atoms. You might want to use this option to check your stereochemical notation.
The sub-structure defined above, and a more complicated reaction searches is predefined here. These explore much deeper depths of the Beilstein programs, and should be attempted only when you have tried simpler searches. On Windows, you cannot load this query directly into Commander. Instead, when you click above, it will be loaded directly into the structure editor. From here, you will need to select the entire structure, copy it, then go to Commander, click on the structure window, and paste the query in.
Mini Project
Define a search for aspirin using any of the methods above. You should arrive at a single hit (there is only one molecule that can be called aspirin). Some of the searches above may provide many more! You will need to use your own initiative to find out what the actual molecular structure of aspirin is. Once you have that single hit, find out how many times its MP (melting point) has been reported, and view all the various values. You should notice something very odd indeed! Make a notice of what you observe, and return to this mini project later on.
3D structure searching of the Cambridge Crystallographic database
ConQuest invocation of the Cambridge Crystal Structure Database. Select Conquest from the Start/Programs menu. You will have to reply yes to the question about certificates and then first your username and then your password at the two prompts (both of which appear to ask for a password). Then, enter the Site No. as 183 and the site password as 5E20C9 and respond to the prompts about online registration. This is a one-off, and you will not need to do it again.
See if you can determine whether the nitrogen atom in penicillins is planar or non-planar! Do a search by drawing the molecule, note the 6-8 letter identifier for the structure you are interested in, and save the 3D coordinates in PDB or CIF format via File/Export, decide how you want to select entries, specify one file per entry and SAVE. Inspect the structure by double clicking the file created, to be found on drive L:
Try the following advanced search. The objective will be to find any short interactions between the H of an OH group and the centroid of a phenyl ring as the electron donor (a very unusual type of π-facial hydrogen bond). Proceed as follows:
Open Conquest and invoke the Build Queries/Draw option
Deposit a benzene ring from the template which should appear on the left
Click on ADD 3D, select all the six carbon atoms in turn (they will go green) and define a centroid. A defined object labelled CENT1 now shows. Press Done.
Back in Draw mode, draw a C-C bond, convert one atom to H, the other to O.
In ADD 3D mode again, click first on the H of the OH group, then on CENT1 in the list of defined objects. A green line connecting the two appears. When a Valid parameter entry named Distance appears, click on Define.
Select Intramolecular from the Choose distance type menu, OK, then Options, enter 2.0 - 2.4 as the range of distances and Separated by 5 - 999 bonds. Hit OK and then Done. Your search query is summarized in a cyan box at the top right of the draw window.
Select Search, tick the 3D Coordinates determined box and Start Search. This search should proceed at the rate of about 1% per second. You should get 17 hits.
View entries via 3D Visualiser. Note the so-called REFCODES. Note CIYSIM in particular!
A right-mouse click in the blue window of the 3D Visualiser will enable you to set spacefill mode, and to inspect whether any two atom spheres inter-penetrate eachother indicating an attractive interaction between them.
Save the coordinates of any selected hits via File/Export, Select PDB or CIF as the format, all selected entries, one file per entry and SAVE.
The files will appear on your L: drive. Double click to open up the WebLab Viewer Pro or Mercury program, and resave them if you wish as an MDL Molfile rather than PDB.
If you want to explore further, define an NH bond rather an OH bond (you might need to increase the distance range to eg 2.0 - 2.5).
Try this with centroids to other π-electron rich systems, such as an alkyne, alkene, or other rings such as cyclopentadienyl, etc.
Go to your network drive N: or L: (i.e. username on neon.ch.ic.ac.uk) and copy any .PDB or .CIF or .MOL files from the search from there to your project area. Incorporate any molecule files into a Wiki page by using code similar to the following. You will have to replace the inline contents with those of any e.g. PDB file resulting from a database search. You can do this by opening the PDB file with a simple text editor such as Wordpad, selecting, copying, and then pasting the coordinates into the Wiki (see below). You can also edit e.g. the size of the window showing the molecule, the background colour, the display mode (e.g. to spacefill) etc.
Mini Project (continued)
Perform a Conquest search for aspirin. You will find 13 crystal structures. Can you reconcile the results you obtained here with the melting point query you did before? What relevance do your conclusions have for the pharmaceutical industries?
Final laboratory Session: Creating/Editing a Wiki page
This part of the course shows you how you can create a Wiki(pedia)-like article on a chemical topic, which includes some molecular information (such as e.g. coordinates for a rotatable model). The objectives in this part of the course are
to learn how to create a simple Wiki page. This is much simpler and quicker than creating a Web page by writing HTML (Wiki is apparently the Hawaiian for quick). The Wiki is used by some laboratory courses for submitting student reports.
to experiment with some simple Wiki extensions, which are shown below. You should experiment with the features described in sections 3.2 - 3.8 below. There are of course many other features in the full Wiki which you can also experiment with if you wish (including e.g. installing additional useful templates).
General Wiki instructions
Creating a report pageStart the process by opening Firefox as a Web browser, and install Greasemonkey For Firefox (this is done on a per user basis, and is optional if you want to have your Wiki interface look a little more similar to Word) followed by an install of wikEd.
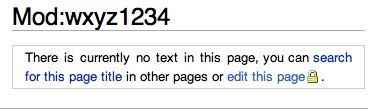
The editing environmentYou will now need to create your own page on this Wiki. Firstly, login to the Wiki using your College ID and password. Then, on the address entry bar of the browser, enter something like the following
If wzyz1234 is indeed unique (as it must be), the system will respond as shown on the right. If not, try another (hopefully more unique) string. When you succeed, proceed to edit the page.
If you chose to invoke the wikEd extra above, you should now get a richer additional toolbar along the top of the page which you can use for editing (but only with Firefox; it will not work with Internet Explorer). There are just a few simple rules for creating effects:
Headers are indicated by balanced = signs (one for a top level, two for the next, and so on)
Bold is indicated by balanced '''signs'''
Italic is indicated by balanced ''signs''
You can use the little menu items at the top to achieve these effects
Each item in an intended list is prefaced by * or #
Chemical effects, i.e. superscripts and subscripts are done as: <sup>superscripts</sup> and <sub>subscripts</sub>
See the effects of what you have done by selecting Show Preview.
Important: Once satisfied the preview shows what you want, enter something descriptive into the Summary page. Once this is completed, click on Save Page. Your entry is now added to the History of the article.
Images. These should be in GIF, JPG or PNG format only. Other formats (.bmp etc) are NOT allowed. They can be obtained by saving from Web pages, or taking a Screen snapshot. The latter is invoked by pressing the F13 (Print Screen) key (Windows, press ALT+F13 to snap only the active window and pasting the snapshot if necessary into an editing program (e.g. Microsoft PhotoEditor on Windows). Save the image with a sensible name (adding .gif, .jpg or .png to the name). Once created, you will need to upload (the) file to the Wiki. Click on upload file on the lhs of the Wiki page, and follow the instructions. Make a note of the name of the file (which has to be unique, and not the same as any other person's name. If you are asked to replace a file, err on the side of caution and instead rename it).
To include that image in your page, navigate back to your page and enter the following: [[Image:Nameofyourfile.jpg|thumb|right|200|Description of image]] where left|right indicates the alignment you wish. Inclusion of thumb produces a thumbnail which can be expanded by clicking on it. The name should correspond to that of the file that you have uploaded using the Wiki menu on the left hand side.
To add hyperlinks to other Web pages, paste the following: [http://www.ch.ic.ac.uk/local/it/ CIT Web pages]
To add links to other pages in the departmental Wiki, [[Organic:pericyclic_historical|Description of page]]
Including Molecules
To include molecule coordinates in a Wiki, save a Molfile (.mol) or PDB file (.pdb) created using Corina or converted from a Cambridge crystal structure database. Upload the file using the menu on the lhs of this display, and then invoke the name of the file as shown belowe: <uploadedFileContents>name-of-your-uploaded-molecule-file.pdb</uploadedFileContents>.
Simple Molecule Display
Select and copy the text to the right of the molecule box and paste it into your own wiki page. then click preview to see if it works. Once you have gotten this working, you can try with your own molecule, and then your own scripts. In the script below, cpk -25; sets the atom size to ball and stick instead of spacefilling. Important. Make sure when you past the code below into your Wiki page that it is not corrupted in any way (ie that you miss a line off at the top or bottom). If you only paste a part of the below in, you will get an XML error which is not easy to recover from.
For a manual of the complete Jmol commands see here. The key line to edit is the text enclosed <script>as script</script. For example, the script below turns the CPK mode on and off, and measures the length between two atoms.
A useful construct, a template to enter a DOI, is invoked thus: {{DOI|value-of-the-DOI}}. If you have found an original reference to the literature, you should cite it via its DOI, as shown below.
Another useful template is that used to include Acrobat documents within a Wiki using the template {{pdf|name-of-uploaded-acrobat.pdf|description-of-Acrobat-file}}.
References
This shows how citations[1] can be added to text[2] to produce a nice effect. To give a reference a unique identifier, use <ref name="Blogs">None. You can then refer to the same footnote again by repeating the tag with the same name.[1] The text inside the second tag doesn't matter, because the text already exists in the first reference (but it cannot be blank). Collected citations appear below here:
↑ 1.01.1Example of adding a citation DOI:10.1021/ja9825332Cite error: Invalid <ref> tag; name "Blogs" defined multiple times with different content
You may have need to express some equations on the Wiki. This is currently supported only using a notation derived from LaTeX, and as with the Jmol insertion above, is enabled within a <math>\frac{-b\pm \sqrt{b^{2}-4ac}}{2a}</math> field inserted using the default editor (the SQRT(n) button), and producing the following effect:
Discussion and History
Each Wiki page has a history. If you make a mess of a page, you can always revert to an earlier version via the History feature. Each page also has a discussion, where you and others can debate discuss some aspect of the topic.
Converters to the Wiki format:
You can also convert a Word document. Open it in OpenOffice (rather than the Microsoft version) and export as Mediawiki. Open the resulting .txt file in eg WordPad, select all the text, copy, and then paste this into the Wiki editing page. You will still have to upload the graphical images from the original Word document separately.
OpenOffice 2.4/3.0 can read .doc documents and export them to MediaWiki.
There is also a HTML to Wiki converter which you can use to import an existing Web page into a Wiki.


 Acrobat
 documents within a Wiki using the template