Talk:Mod:Hunt Research Group/MolCluster
What is MolCluster?
MolCluster is a tool (developed by Vincent and Gabriel) that can be used to cut clusters from MD trajectories and create the input files for ChemShell.
To use MolCluster, you will need:
- The latest version of MolCluster (available from Vincent).
- Python version 2.7.6, or above.
- The HISTORY file from which the clusters are to be cut, and the corresponding FIELD file. Note: these need to be in DL_POLY format. If you have used the 'restart' option in DL_POLY, the header of the HISTORY file may need to be amended. Additional transformations of the HISTORY and FIELD files, to convert atom labels into an acceptable format for MolCluster/ChemShell, may also be required (example given later).
Using MolClusterV2.3: Basic Instructions
1. Create a directory within the main MolCluster directory. Put the required HISTORY and FIELD files here.
2. Load MolCluster: ./MolCluster.py
3. Requests directory name to be specified (this is the location of the FIELD and HISTORY files). After specifying, the code will attempt to read and give an overview of the system.
- if you need a demo file to practice on download this history file: Media:TEST_CUSO4_DLPOLY_HISTORY.rtf
4. UPDATE - select option 1 to cut a cluster containing the QM region, active MM region and frozen MM region. We think options 2a and 2b are necessary for adding point charges
Select option 2 to cut clusters, then you will be asked to identify the mechanism for choosing the clusters to cut, giving n or c:
- -->[n]: Cut a cluster every "nth" step or configuration.
- -->[c]: Select a custom set of configurations i.e. you can specify exactly which configurations you want.
- normally option n will be selected
- once you have made the n or c selection options will relate to which clusters are to be cut, N.B: numbering starts from 1 (i.e. 1st timestep).
- For option n you will give an integer to identify the "nth" step to cut at. Therefore, if you request n=1000, clusters for configurations 1, 1001, 2001 etc. will be created.
- The demo HISTORY file has only 5 steps, so if using this file select 2 to get 2 structures
- For option c you will need to give the integer number of the specific step you want cut.
- MolCluster will then tell you the the relevant coordinates have been generated
5. Once the configurations have been extracted, you will be asked to choose how the origin will be defined in the clusters to be cut. Options are:
- -->[AN]: Atom number
- -->[AT]': Atom type
- -->[MN]': Molecule number
- -->[MT]: Molecule type
- -->[C]: Custom coordinates
- If using the demo HISTORY file choose AT
You will then see a number of options from which you can specify the exact atom number/type.
- If using the demo HISTORY file choose number 6 (this file has Cu-SO4+2000 waters, and O3 is the oxygen atom between Cu and S i.e. Cu-O-S
6. MolCluster will now ask for
- Available cluster construction definition:
- -->[R] Fixed radius
- -->[M] Specify number of each molecule type (i.e. the number of those molecules to include within the cluster radius)
- If using the demo HISTORY file you want to select R
- MolCluster will then print out some information for you this will give you some idea of the number of atoms within various radii
7. In the next step, if 'R' was chosen, it will ask for the total radius (in Angstroms) of the cluster(s) to be cut, containing the QM, active MM and frozen MM regions. If 'M' was chosen it will ask for the number of each molecule (check ... will it be just for the water)
- If using the demo HISTORY file you want to select 20 (this is a big radius so that we can have a QM region surrounded by an active MM region which is in turn surrounded with an inactive MM region)
8. Next it is possible that your chosen radius can cut through a molecule, thus MolCluster has two options for deciding which atoms to include/exclude at the boundary of the clusters being cut:
- -->[H]: Hard boundary - all atoms of a molecule must be within the cutoff radius to be included (i.e. molecules can be cut with some atoms appearing in the cluster and others not).
- -->[S]: Soft boundary - if the centre of mass of a molecule is within the cutoff radius, the whole molecule will be included.
- If using the demo HISTORY file you want to select S the soft option
- If [H] is selected: With a hard boundary, the whole molecule (i.e. all of its atoms) has to be within the boundary. In other words, for any atom whose distance away from the origin is greater than the specified cluster radius, it’s associated molecule will not be included in the cluster. Since only full molecules are included, there will not be any dangling bonds under any circumstances.
9. Specify if the clusters are required to be neutral (Y/N).
- Vincent will add something here about how a cluster is neutralised (important for the ILs)
- If using the demo HISTORY file you want to select Y option to have a neutral cluster
10. Decide on the output format, this can be for chemshell or a simple xyz:
- -->[C]: Generates a ChemShell fragment input file, with accompanying .xyz co-ordinates file.
- -->[X]: Generates the .xyz co-ordinates file only.
- If [X] is selected, the clusters will be cut, .xyz files generated and MolCluster will terminate.
- If [C] selected, you will be asked if you would also like to generate the necessary ChemShell input files for a QM/MM optimisation (Y/N).
- If using the demo HISTORY file you want to select C for chemshell and Y for QM/MM
NOTE: there can be a central active QM region (C), an active MM region (SA) and a frozen MM region (SF) (Figure I)

11. If your answer to step 10 was [C] (generate a ChemShell fragment input) and Y (generate ChemShell input files for a QM/MM optimisation), you will then be asked to define the QM region. Available options are:
- -->[S]: Spherical region (or threshold) centred about the defined origin (although not necessarily completely spherical if you have chosen a soft bondry)
- -->[M]: Choose the number of molecules closest to the origin that will be included.
- -->[A]: By an upper limit of atoms. Only whole molecules & those closest to the origin included.
- -->[C]: Custom region i.e. can select molecules individually to be in the QM region
- -->[O]: Spherical regions centred about one or more origins (for example we could choose S of SO4 as an origin and Cu as an origin and have two intersecting "regions")
- If using the demo HISTORY file you want to select O for multiple origins. Then choose the number of origins as '2', since we want to define the regions centred about S and Cu. After choosing '2', it will list the atoms and the corresponding number, choose numbers corresponding to S and then include the desired radius. then choose Cu( by choosing the number corresponding to copper from the list) and then enter the radius. To choose the radii for each region, look at the radial distribution plot obtained for Cu-O(water) and S-O(water) from DL_POLY production run. Use the distance of the first minima as the radius.
- If [S] is selected, MolCluster will print out some information, estimating the number of atoms in the regions defined by specific radii to help you evaluate the best radius to choose. Choose a radius!
- If using the demo HISTORY file you want to select 5.0 for the first solvation sphere around the Cu-SO4 ion-pair
- If [O] is selected ...
- Next MolCluster will ask you to specify the QM radius you want (in Angstroms)
- Note this radius must be less than, or equal to, the total radius of the cluster. Soft boundary conditions are implemented.
- If [C] is selected once the active region and the directory/filenames have been defined, MolCluster will then ask for the custom QM regions to be defined .
12. Now MolCluster will ask you to select the type of active region definition from,
- -->[S] Spherical region centred about the origin
- -->[M] By number of total molcules closest to the origin
- -->[A] By an upper limit of total atoms closest to the origin
- -->[N] Specific numbers of each molecule type
- this is similar to choosing the total cluster size options, however the radius should be larger than the QM and smaller than the total cluster size!
- If using the demo HISTORY file choose 'S'
- Here four options are present, [S], [M], [A] and [N], but in the next step to select from these options, the programme lists only two options(S/N). This is just an error in the output to screen and you can still select the other two options. This will be fixed in the next version.
- this is similar to choosing the total cluster size options, however the radius should be larger than the QM and smaller than the total cluster size!
13. If [S] is selected, MolCluster will estimate the number of atoms within a set of radii and will ask you to enter the desired radius of the active region
- If using the demo HISTORY file choose give a radius of 15.0Å for the active region
14. Next MolCluster will ask you to select a coordinate system under which the optimisation will take place. Three different co-ordinate systems are available in ChemShell for optimisation.
- -->[C]artesian (constraints not permitted)
- -->[D]elocalised internal coordinates (DLC)
- -->[H]ybrid delocalised internal coordinates (HDLC)
- Select C, D or H to define the coordinate system
- If using the demo HISTORY file choose C the cartesian coordinates
- we have had problems with the hybrid HDLC option so only choose this if you are an expert
- HDLC are ...
- Select C, D or H to define the coordinate system
15. Give the name of the output directory into which MolCluster should write files, followed by a base name 'cluster'
- if using one of the in-house python scripts you must use 'cluster'
- If using the demo HISTORY file perhaps use the directory "test1" and "cluster"
16. In the next step, we can save the bulk and cluster data objects to be generated for debug purposes by selecting 'Y'. if not required, select 'N' and MolCluster will generate the clusters.
- Data objects:This was setup mainly so that it would be easier for Vincent to run some tests if there was something wrong with the clusters. He will have this option removed from the next version and perhaps instead have a ‘debug’ version of MolCluster.
- If using the demo HISTORY file chose N
- MolCluster will now generate the clusters and files required
- if you used a central radius you will see something like this
Please give output basename (no spaces and only alphanumeric and underscore
characters allowed): cluster
--------------------------------------------------------------------------------
Do you want the bulk and cluster data objects to be generated for debug purposes
[Y/N]? N
--------------------------------------------------------------------------------
Creating directory 'test1/cluster_1'
--------------------------------------------------------------------------------
Generating 2x2x2 supercell...

Cluster 1 out of 5 generated...

ChemShell potential file test1/cluster_1/ff.dat...

...generated

--------------------------------------------------------------------------------

There are 18 molecules (54 atoms) in the QM region.

The total charge of the QM region is 0.0.

--------------------------------------------------------------------------------

OOOOOOOOOOOOOOOOOOOOOOOOOOOOOOOOOOOOOOOOOOOOOOOOOOOOOOOOOOOOOOOOOOOOOOOOOOOOOOOO

OOO      System information written to test1/cluster_1/system_info.txt       OOO

OOOOOOOOOOOOOOOOOOOOOOOOOOOOOOOOOOOOOOOOOOOOOOOOOOOOOOOOOOOOOOOOOOOOOOOOOOOOOOOO

--------------------------------------------------------------------------------

Creating directory 'test1/cluster_2'

--------------------------------------------------------------------------------

Generating 2x2x2 supercell...

Cluster 2 out of 5 generated...

ChemShell potential file test1/cluster_2/ff.dat...

...generated

--------------------------------------------------------------------------------

There are 19 molecules (57 atoms) in the QM region.

The total charge of the QM region is 0.0.

--------------------------------------------------------------------------------

OOOOOOOOOOOOOOOOOOOOOOOOOOOOOOOOOOOOOOOOOOOOOOOOOOOOOOOOOOOOOOOOOOOOOOOOOOOOOOOO

OOO      System information written to test1/cluster_2/system_info.txt       OOO

OOOOOOOOOOOOOOOOOOOOOOOOOOOOOOOOOOOOOOOOOOOOOOOOOOOOOOOOOOOOOOOOOOOOOOOOOOOOOOOO
and once all the clusters have been generated you should see this:
IIIIIIIIIIIIIIIIIIIIIIIIIIIIIIIIIIIIIIIIIIIIIIIIIIIIIIIIIIIIIIIIIIIIIIIIIIIIIIII

III                         All clusters generated.                          III

IIIIIIIIIIIIIIIIIIIIIIIIIIIIIIIIIIIIIIIIIIIIIIIIIIIIIIIIIIIIIIIIIIIIIIIIIIIIIIII

--------------------------------------------------------------------------------

Please report any bugs to Vincent Chen (vhc08@ic.ac.uk) or Gabriel Lau

(gvl07@ic.ac.uk). The log file can be found in 'temp/molcluster.log'.

--------------------------------------------------------------------------------

OOOOOOOOOOOOOOOOOOOOOOOOOOOOOOOOOOOOOOOOOOOOOOOOOOOOOOOOOOOOOOOOOOOOOOOOOOOOOOOO

OOO                       Log file copied to 'test1'.                        OOO

OOOOOOOOOOOOOOOOOOOOOOOOOOOOOOOOOOOOOOOOOOOOOOOOOOOOOOOOOOOOOOOOOOOOOOOOOOOOOOOO

--------------------------------------------------------------------------------

EEEEEEEEEEEEEEEEEEEEEEEEEEEEEEEEEEEEEEEEEEEEEEEEEEEEEEEEEEEEEEEEEEEEEEEEEEEEEEEE

EEE                            Exiting molcluster                            EEE

EEEEEEEEEEEEEEEEEEEEEEEEEEEEEEEEEEEEEEEEEEEEEEEEEEEEEEEEEEEEEEEEEEEEEEEEEEEEEEEE
The Output Files
- Each cluster will have its own directory within the directory named in step 12. These subdirectories will be named: cluster_1, cluster_2...cluster_n.
- Within the main directory one will also find a file called molcluster.log and a file called bulk_system_info.txt.
- molcluster.log is a record of the user responses to each of the MolCluster options (look at this if you have forgotten, for example, the cluster radius).
- bulk_system_info.txt summarises information relating to the system before clusters are cut (e.g. number and type of molecules, total number of atoms, total system charge, atom labels within a molecule, atomic charges).
- If option [X] selected in step 9, each subdirectory cluster_n will contain:
- The cluster_n.xyz coordinates file
- system_info.txt: Summary of the cluster (e.g. total number of molecules, total number of atoms, total charge)
- If option [C], Y selected in step 9, each subdirectory cluster_n will contain:
- The cluster_n.xyz coordinates file
- system_info.txt: Summary of the cluster (e.g. total number of molecules, total number of atoms, total charge)
- The cluster_n.chm coordinates file. This will be used to create the cluster.pun ChemShell input file.
- cluster_tiered.xyz: xyz coordinates with the QM, active and frozen regions defined (all QM atoms listed as X1 (X=element symbol), active as X2 and frozen as X3). This file can be used to easily visualise the different regions in VMD.
- conn.txt : the connectivity data needed by ChemShell
- ff.dat : the forcefield in ChemShell format
- opt.chm: ChemShell input file. Options for the ChemShell optimisation specified here.
To visualise in VMD
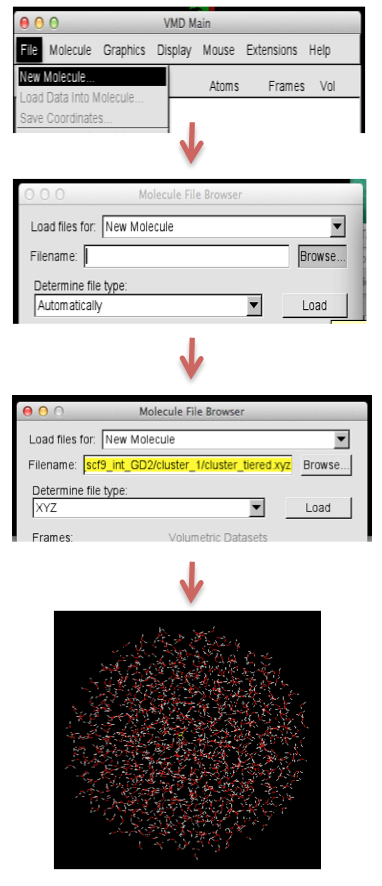
- open the cluster_tiered.xyz file in vmd: File → New Molecule → Browse → select the file type → Load the file
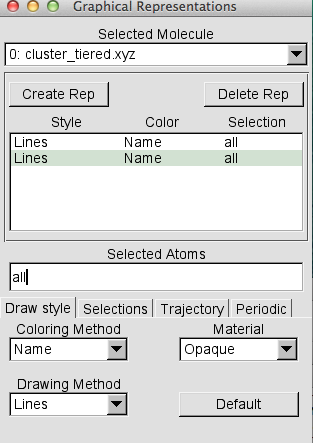
- To highlight each layer in the cluster, open graphical representation
- To create a new representation: click on 'Create Rep', a new line will appear
- In the 'Selected Atoms' type
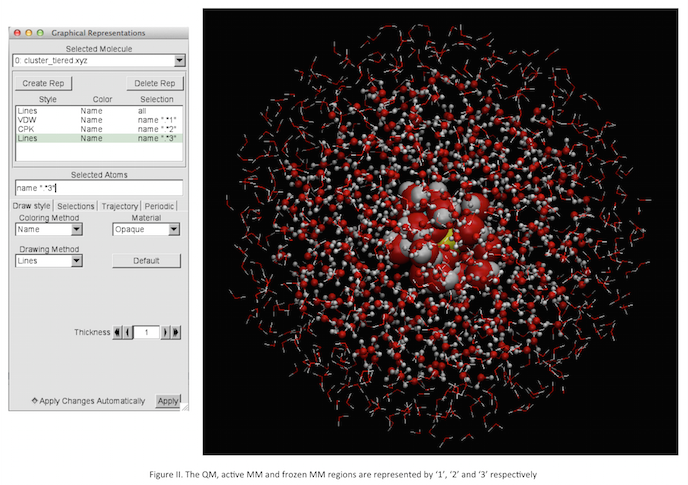
 name ".*1"  for the 1st QM region  and  from the 'Drawing Method' select VDW
 name ".*2"  for the 2nd active MM region,  from the 'Drawing Method' select CPK
 name ".*3" for the 3rd frozen MM region, from the 'Drawing Method' select Lines
- The highlighted layers are shown in Figure II.
IMPORTANT In VMD atom numbering starts at 0, whereas the MolCluster and ChemShell files start with atom number 1. When visualising things in VMD all of the indexing will be 1 less than the atom number in opt.chm.
Input for ChemShell
- To run a QM/MM optimisation, three input files are required:
 opt.chm
 cluster.pun
 ff.dat
- MolCluster will not generate cluster.pun, but it generates cluster_n.chm which is used to generate cluster.pun
- To generate cluster.pun from cluster_n.chm, load ChemShell and then run cluster_n.chm directly on the cx1 login shell
module load chemshell/3.5.0
  chemsh.x cluster_n.chm
- NB: check the connectivity in the cluster.pun
- edit the opt.chm according to the system under study
- open opt.chm and edit the 'qm_theory' options (nproc, scfconv, g98_mem, charge, multiplicity, basis set, method etc )
- include the conn and mxexcl after the mm_theory. mxexcl depends on the QM region, please refer ChemShell manual for more details link
    qm_theory=gaussian : { nproc=15 maxcyc=200 scfconv=5 basis=631gdp g98_mem=640000000 charge=0 mult=2 hamiltonian=b3lyp } \
     mm_theory=dl_poly : { mm_defs=ff.dat \
     conn=cluster.pun \
     mxexcl=500 \
NB: please make sure that there is no space left after the backslash in every line. If there is any space after the '\', the job will be terminated
- the submit script, submit_opt.sh, to run ChemShell optimisation is here link
- the ChemShell optimisation creates as set of checkpoint files, gaussian files and 'path' files along with the output 'opt.out'
- load 'path_active.xyz' in VMD to follow the optimisation
- To restart a job
- rename the 'op.out' to 'opt.out-n' (n=1,2,3..), else the previous opt.out will be overwritten and will loose the data. Please maintain the format as 'opt.out-n', since the python script to analyse the data reads this file format
- open opt.chm
- increase maxcyle at the end of the file and add 'restart = yes \' command as the second last line
     list_option = full \
     maxcycle = 1500 \
     dump = 1 \
     restart = yes \
     result = cluster_opt.pun
- edit the submit script to read the checkpoint files before submitting the job link
- Analysis of the ChemShell optimisation
- A python utility has been developed by Vincent to extract the various contributions to the total QM/MM energy, atom-atom distances and other parameters from the ChemShell output
- Among the files generated 'n_Cu_OW_first_solvation_shell_init_and_final_dist.txt' lists the number of each of the water oxygens in the first salvation shell (here for the first salvation shell of Cu along with the distance of each of the Ow from Cu) and 'n' is the cluster number link
- To trace back the particular water molecule in the 'n_Cu_OW_first_solvation_shell_init_and_final_dist.txt' to the DL_POLY HISTORY file, first map it to the Ow atom number in the opt.chm
- To map the Ow number to that in opt.chm, go to 'active_atoms' in opt.chm
active_atoms = { 1 2 3 4 5 6 7 8 9 13 14 15 16 17 18 31 32 33 52 53 54 55 56 57 58 59 60 61 62 63 67 68 69 73 74 75 76 77 78 79 80 81 85 86 87 88 89 90
- bring the curser to '{'
- say for example the Ow number from the 'n_Cu_OW_first_solvation_shell_init_and_final_dist.txt' is 163, type '163' and press 'w'
- It will give the Ow number in opt.chm (e.g365). to go back to '{', enter163 and press 'b'
- In the cluster folder has 'atom_no_mapping.txt' created by MolCluster, which contain a list of 'orig_atom_no' and ' new_atom_no'. 'orig_atom_no' is the number in the HISTORY file and 'new_atom_no' is the corresponding atom number in the opt.chm
- open 'atom_no_mapping.txt' and map the atom number '365' to 'orig_atom_no' list.
- e.g if the 'orig_atom_no' is '643', use '643' in the script to draw the path of the centre of mass of a molecule throughout an animation link
Step-By-Step Example: Ionic Liquid Clusters
Our example system:
- 256 ion pairs of [C4C1im][MeSO4]
- In total, the production run is 20ns in length; 4 lots of 5ns employing the "restart" keyword in DL_Poly.
- Our aim is to cut clusters from the last 5ns of the trajectory and create the input files for a ChemShell optimisation.
1). Create a directory within the main MolCluster directory and put the HISTORY and FIELD files here. Our directory will be called: BMIM_MESO4_EXAMPLE.
2). We now need to check to see if the HISTORY and FIELD files are in the correct format.
- As the restart keyword has been employed, two lines are missing from the header of the HISTORY file, Figure 1a and 1b. MolCluster does not like this. Therefore, we need to add in the two lines that it is expecting to see, Figure 1c.

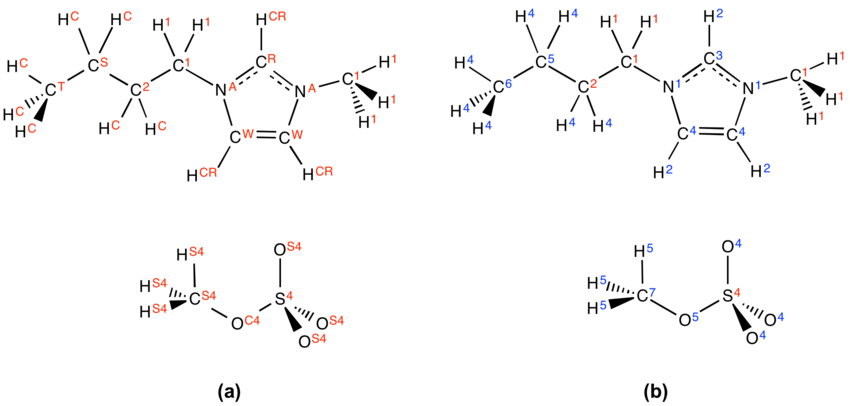
- The second problem we need to address is the atom labelling. The original atom labelling for [C4C1im][MeSO4], as used in the DL_Poly simulation, is shown in Figure 2a. Unfortunately, ChemShell has issues with this. To keep ChemShell happy, we have to change the atom labels in the HISTORY and FIELD files to the format elementsymbolnumber e.g. C2 rather than CR. Thankfully, this is quite easy to do using a script (sub_script.sh, see below) written by Vincent. Firstly, however, we need to decide upon the new atom labelling. This is shown in Figure 2b for our example system. sub_script.sh requires that we have defined the atom label mappings in a file called sub_map.txt (also shown below for this system).
sub_script.sh:
#!/bin/bash

while read line

do

#echo $line

s1=$(echo $line | awk '{ print $1 }')

s2=$(echo $line | awk '{ print $2 }')

echo "$s1 $s2"

gsed -i_bu2 "s|\<$s1\>|$s2|g" FIELD

gsed -i_bu2 "s|\<$s1\>|$s2|g" HISTORY

done < sub_map.txt
sub_map.txt:
CR C3

NA N1

CW C4

HCR H2

HCW H3

HC H4

CT C6

OS4 O4

OC4 O5

HS4 H5

CS C5

CS4 C7
- Run ./sub_script.sh
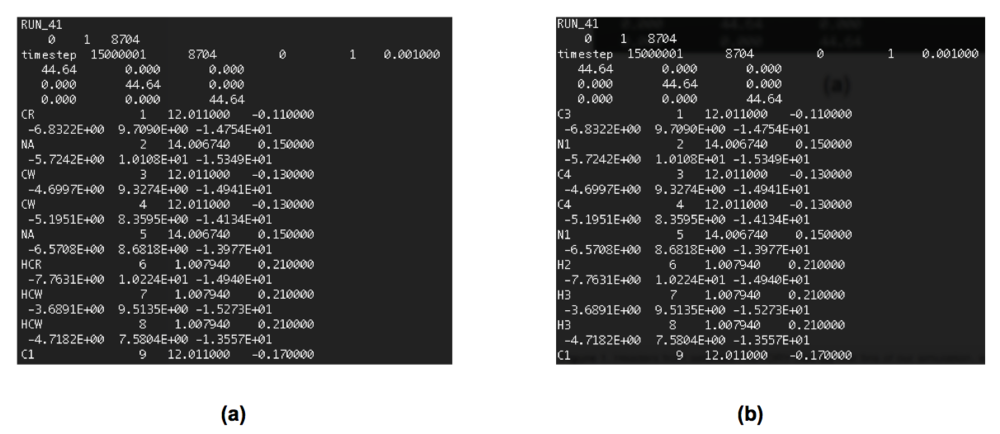
Note: this process may take a while, depending on the size of the file. Progress can be seen in the terminal (example shown in Figure 3), with each of the mappings specified in sub_map.txt considered in turn. The first few lines of the HISTORY file, before, and after, the relabelling can be seen in Figure 4.

3). Now our files are in the correct format, we can run MolCluster: ./MolCluster.py
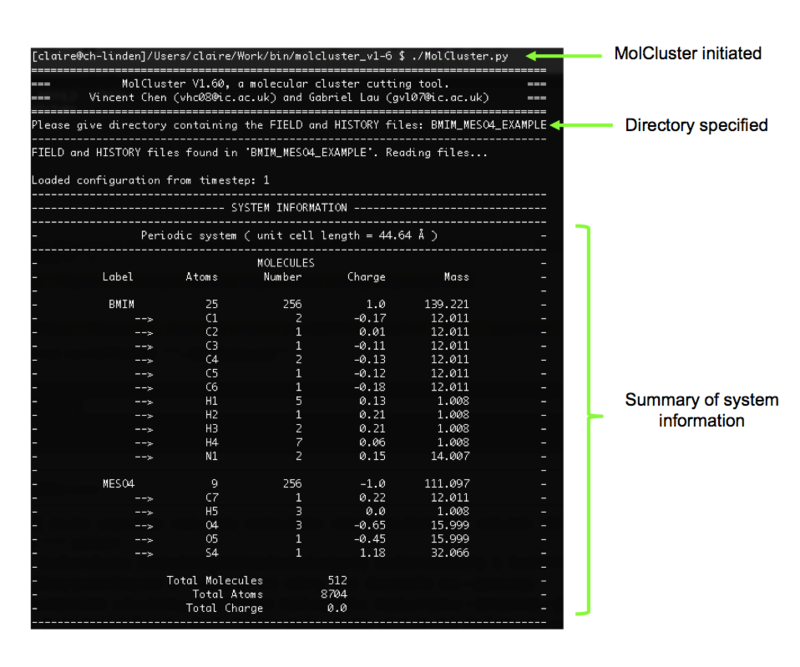
4). The first thing MolCluster does is to ask us to specify the directory containing the FIELD and HISTORY files. Our directory is called BMIM_MESO4_EXAMPLE. Once this has been specified, MolCluster will attempt to read the files and generate a summary of the system (from timestep 1 of the trajectory). This is shown in Figure 5 for our system, and it can be seen that the information summarised by MolCluster is correct.
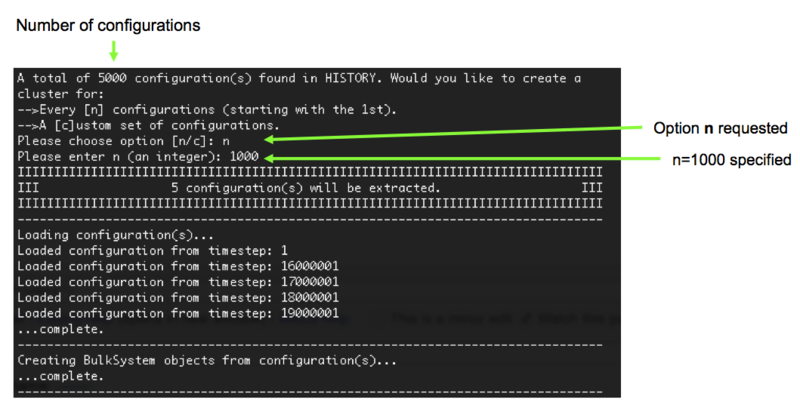
5). MolCluster works out how many configurations in the HISTORY file (5000 in our example) and then asks us to specify the configurations we would like to cut a cluster from. In this case, we are going to select the [n] option (cut a cluster from every 'nth' configuration) and then specify n as an integer, in this case 1000 (i.e. n=1000, therefore cut a cluster every 1000th time step), Figure 6.
6). We must now select how we would like to define the origin of the clusters to be cut. We are going to select option [AN] (atom number) and choose atom 1 to be the origin (for reference, in our case this is a C3 atom), Figure 7.

7). An estimate of the number of atoms in regions with varying radii (with respect to our defined origin) is provided by MolCluster. We need to cut a cluster large enough to incorporate a reasonable number of ion pairs (bearing in mind that our cation alone, in all trans form, is over 9 Angstroms in width), but not so large that the calculation is unfeasible. The ideal size is still being investigated, but for now, let us specify a cluster radius of 15 Angstroms, Figure 8.

8). MolCluster now asks us to tell it which boundary condition to use when cutting the clusters (essentially this is just how MolCluster will decide whether or not to include a molecule in the cluster for molecules at the boundary). We will select [S] (soft boundary) here. We are then asked to specify if the cluster needs to be neutral. Obviously this is only really applicable to charged systems (with counter ions), such as ionic liquids . We will select yes here, [Y], so that all our clusters have the same total charge, Figure 9.

9). We now need to decide on the output file type. As the ultimate aim is to run QM/MM optimisations of our clusters, we need to select the options that will generate the ChemShell input files: [C], [Y], Figure 10.

10). A decision on how the QM region will be defined is now made. We are going to select [S] (spherical region). MolCluster then estimates the number of atoms in regions of varying radii with respect to our origin. Again, as with step 7, the optimum size has not yet been deduced. However, from previous tests, a QM radius of 7 Angstroms results in a manageable number of ions and is large enough to observe local structural features. Therefore, we shall specify a radius of 7 Angstroms in this example, Figure 11.
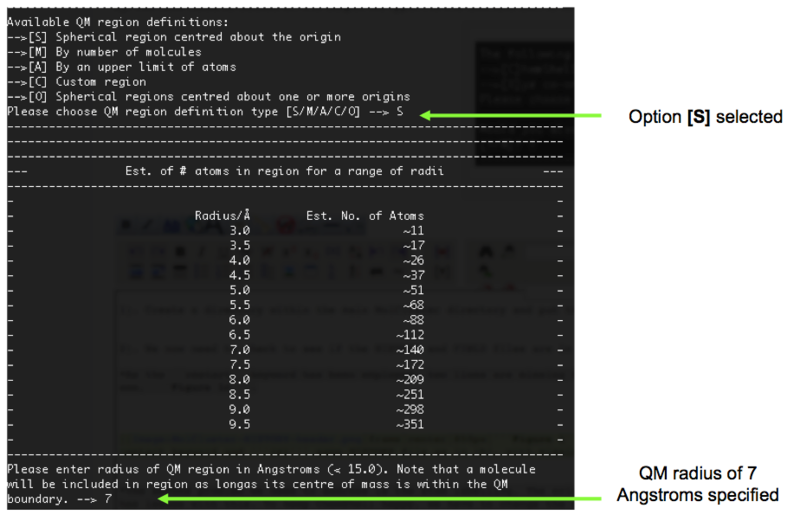
11). After defining the QM region, we then need to define the size of the active region. Again MolCluster helps us by estimating the number of atoms for a range of radii. Molecules not included in the active region, will be in the Frozen region. Fir this example, we shall define the specify active region to have a radius of 11 Angstroms, Figure 12.

12). Finally, we are asked to specify the output directory where all our files will be placed, and the basename for each of our clusters. In this example the output directory will be BMIM_MESO4_EXAMPLE/example and the base name will be cluster, Figure 13.

13). MolCluster then sets about creating the clusters according to our specifications. The terminal output for the first cluster (cluster_1) is shown in Figure 14. After creating all the clusters, MolCluster will terminate.
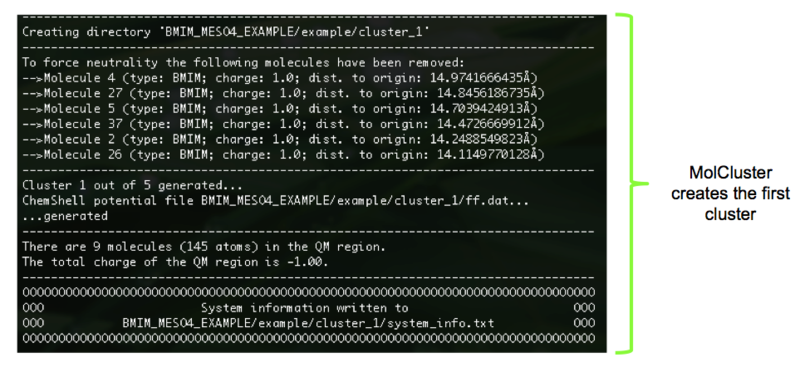
14). Within the named output directory, each cluster has it's own subdirectory: cluster_1, cluster_2 etc. Within each of the subdirectories can be found the requested output files, Figure 15.

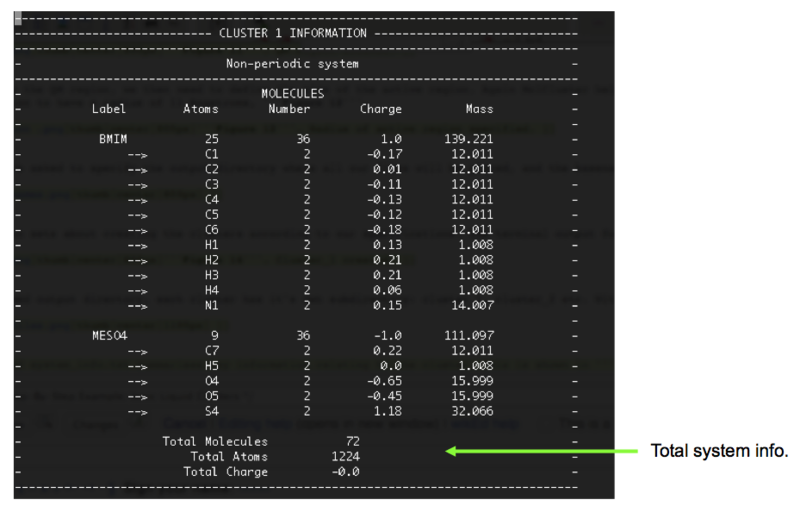
15). The file called system_info.txt summarises key information relating to the cluster. This is shown in Figure 16 for cluster 1. We can see that in total there are 72 molecules (36 cations and 36 anions) and that, as requested, the total charge of the system is zero.
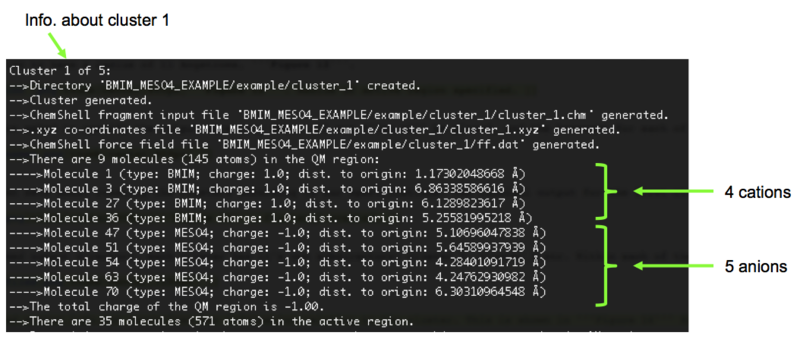
- To find out how many molecules in the QM and active regions, we can open the file called molcluster.log in the parent directory. This is a record of all the options we selected. By scrolling through we can find the information relating to cluster 1, Figure 17, and can see that there are 9 molecules in the QM region; 4 cations and 5 anions, resulting in a total charge of -1. There are 35 molecules in the active region.
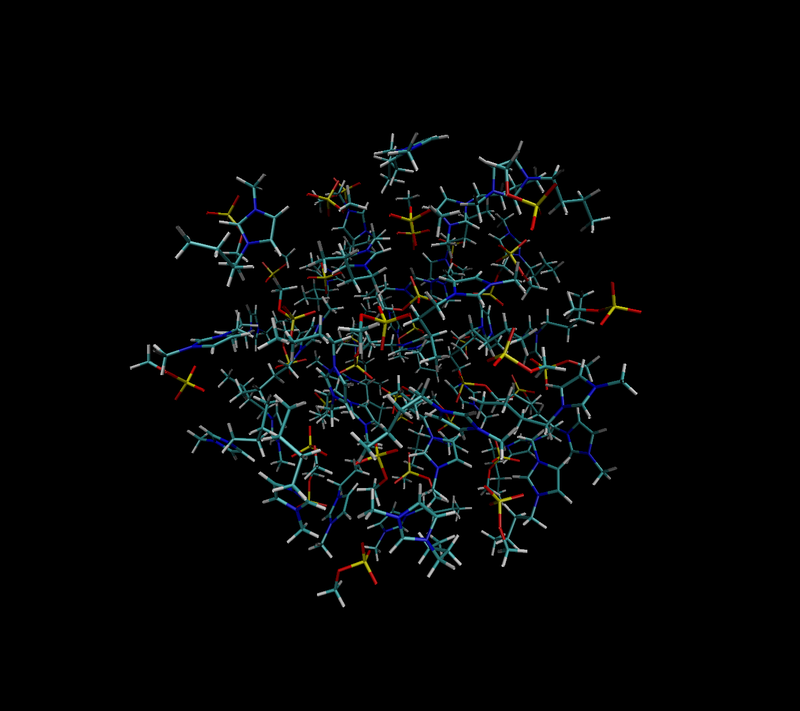
- Returning to the files in our subdirectory cluster_1, we can open cluster.xyz (or cluster_tiered.xyz) in VMD to visualise the cut cluster, Figure 18 for our cluster 1. cluster_tiered.xyz is particularly useful, as it allows us to visualise each of the distinct regions. All of the atoms in the QM region are labelled with a 1 (active labelled with 2 and frozen labelled with 3), therefore we can choose to visualise the QM region only, Figure 19a. In Figure 19b, all the regions are shown in different colours.

Cutting Embedded Cluster
- Embedded clusters are generated in two steps
- First a cluster of specific radius is generated using MolCLuster and Chemshell
1. Load MolClusterV2.3: ./MolCluster.py
2. Enter the directory containing the FIELD and HISTORY files as in the previous case
3. Select option [4] to Generate ChemShell input for cutting embedded cluster
4. then you will be asked to identify the mechanism for choosing the clusters to cut, giving n or c:
- [n]: Cut a cluster every "nth" configuration. N.B: numbering starts from 1 (i.e. 1st timestep). Therefore, if you request n=1000, clusters for configurations 1, 1001, 2001 etc. will be created.
- [c]: Select a custom set of configurations i.e. you can specify exactly which configurations you want.
After this you can choose the step at which the clusters are to be cut
5. Once the configurations have been extracted, you will be asked to choose how the origin will be defined in the clusters to be cut. Options are:
- [AN]: Atom number
- [AT]: Atom type
- [MN]: Molecule number
- [MT]: Molecule type
- [C]: Custom coordinates
You will then see a number of options from which you can specify the exact atom number/type.
6. Enter the radius (in Angstroms) of the embedded cluster(s) to be cut
7. Enter the projected radius (in Angstroms) of the active regions ( this can be any value < embedded cluster radius)
8. Then enter the charge margin - distance (in Angstroms) from the cluster boundary to the outer point charges 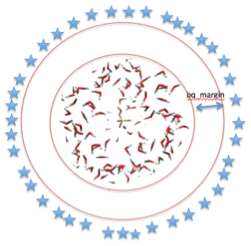
9. enter the number of added point charges. This is calculated from the charge density; (4 * density * density + 2)
10. enter the symbol to represent point charge 'X'
11.Specify the output directory
12. The output directory will haven inputs 'embedded_cluster_n', if chosen 'n' in step 4 and an embedded_cluster_specs.obj file
13. Upload the directory to cx1 login shell
14. In each of the 'embedded_cluster_n' will contain a 'bulk_fragment.chm' having the coordinates
15. generate bulk.pun from bulk_fragment.chm by loading chemshell 'module load chemshell mpi' and 'chemsh.x bulk_fragment.chm'
16. submit the job using the submit script link
- In the second step, clusters with different regions (QM and MM) with point charges outside are cut using MolCluster
17. When the job is finished transfer the folder to the local machine with MolClusterV2.3
18. Load MolClusterV2.3: ./MolCluster.py
19. Enter the same directory containing the FIELD and HISTORY files as given in the first step
20. select option [5] to cut cluster and add point charges
21. MolCluster will ask for the directory containing 'embedded_cluster_specs.obj' of the embedded cluster(s) generated by ChemShell. (the folder containing ChemSehll output)
22. Now the cluster specifications will be asked for. enter 'Y' if you want to use the same radius for the regions as entered before or 'N' if want to change the radius
23.In the next step MolCluster will ask for the type of QM region you want to specify -->[S] Spherical region centred about the origin -->[M] By number of total molcules closest to the origin -->[A] By an upper limit of total atoms closest to the origin -->[N] Specific number of molecules closest to the origin of each molecule type -->[C] Custom region -->[O] Spherical volumes centred about one or more user-defined origins
24. Clusters will be cut at this point and saved to the folder having the 'embedded_cluster_specs.obj' file.
- open embedded_cluster_n, it will have the opt.chm, ff. dat and embedded_cluster_n.chm
25. transfer the folder to cx1
26. load chemshell on cx1 and run
module load chemshell mpi
  chemsh.x embedded_cluster_n.chm
- embedded_cluster_n.pun will be generated
27. open opt.chm and edit the first line "dl-find coords=embedded_cluster_n.pun\". Also make changes in the opt.chm as described in link and run the optimization
28. The submit script link
OLD instructions that relate to MolCluster v1-7
1. Create a directory within the main MolCluster directory. Put the required HISTORY and FIELD files here.
2. Load MolCluster: ./MolCluster.py
3. Requests directory name to be specified (this is the location of the FIELD and HISTORY files). After specifying, the code will attempt to read and give an overview of the system.
4. First select option 2 to cut clusters, then you will be asked to identify the mechanism for choosing the clusters to cut, giving n or c:
- [n]: Cut a cluster every "nth" configuration. N.B: numbering starts from 1 (i.e. 1st timestep). Therefore, if you request n=1000, clusters for configurations 1, 1001, 2001 etc. will be created.
- [c]: Select a custom set of configurations i.e. you can specify exactly which configurations you want.
After this you can choose the step at which the clusters are to be cut
5. Once the configurations have been extracted, you will be asked to choose how the origin will be defined in the clusters to be cut. Options are:
- [AN]: Atom number
- [AT]: Atom type
- [MN]: Molecule number
- [MT]: Molecule type
- [C]: Custom coordinates
You will then see a number of options from which you can specify the exact atom number/type.
6. MolCluster will estimate the number of atoms within a region, for a range of radii with respect to your origin. Use this information to help you decide on the total radius (in Angstroms) of the clusters to be cut. You will be asked to specify this.
7. MolCluster has two options for deciding which molecules to include/exclude at the boundary of the clusters being cut:
- [H]: Hard boundary - all atoms of a molecule must be within the cutoff radius for the molecule to be included.
- [S]: Soft boundary - if the centre of mass of a molecule is within the cutoff radius, the molecule will be included.
8. Specify if the clusters are required to be neutral (Y/N).
9. Decide on the output formats:
- [C]: Generates a ChemShell fragment input file, with accompanying .xyz co-ordinates file.
- [X]: Generates the .xyz co-ordinates file only.
If [X] selected, the clusters will be cut, .xyz files generated and MolCluster will terminate.
If [C] selected, you will be asked if you would also like to generate the necessary ChemShell input files for a QM/MM optimisation (Y/N).
10. If your answer to step 9 was [C] (generate a ChemShell fragment input) and Y (generate ChemShell input files for a QM/MM optimisation), you will then be asked to define the QM region. Available options are:
- [S]: Spherical region (or threshold) centred about the defined origin (although not necessarily spherical??!!)
- If [S] selected, MolCluster will estimate the number of atoms in regions defined by a range of radii. Specify the QM radius. This must be specified (in Angstroms) and must, obviously, be less than, or equal to, the total radius of the cluster. Soft boundary conditions are implemented.
- [M]: By number of molecules. Molecules closest to the origin will be included.
- [A]: By an upper limit of atoms. Only whole molecules & those closest to the origin included.
- [C]: Custom region i.e. can select molecules individually to be in the QM region
- [O]: Spherical regions centred about one or more origins
If options [C] or [O] selected, MolCluster will go straight to steps 11 and 12. Once the active region and the directory/filenames have been defined, MolCluster will then ask for the custom QM regions to be defined per cluster (see step 14).
NOTE: there can be a central active QM region (C), an active MM region (SA) and a frozen MM region (SF) (Figure I), so far you have selected the maximum radius for the size of the cluster, now select the radius of the active MM smaller than this.
11. MolCluster will estimate the number of atoms that would be in the active and frozen regions for a range of active radii. This information can be used to help decide upon an appropriate active radius, specified (in Angstroms) and must, be less than, or equal to, the total radius of the cluster. If all atoms are to be included, simply enter "ALL". Soft boundary conditions are implemented.
12. Specify the output directory (i.e. where your final clusters and associated files will be saved) and specify the base-name for the output files (e.g. if you type "cluster" here, your clusters will be saved as cluster_1, cluster_2 etc.). NOTE: if you are going to use the trajectory_analysis scripts later the base filename must be "cluster".
13. Unless in step 10 above you selected options [C] or [O] (in which case, see point 14), MolCluster will generate the specified clusters and then terminate.
14. If option [C] was selected in step 10, MolCluster will at this point list all the molecules in the first cluster, along with the distances to the origin. You will be asked to list all the molecules to be included in the QM region for this cluster. The same procedure is carried out for each cluster, before the clusters are generated and MolCluster terminates.
If option [O] was selected in step 10, you will be asked to specify how many region centers you employed in setting up a non-spherical QM region. You can choose the centre of the multiple regions via atom/molecule or use the current cluster origin. A table is provided to help you make this choice identifying atom numbers and molecules and their distance from the cluster origin.
- To run ChemShell in Cartesian coordinate (MolCluster1.7):
- open opt.chm and delete the lines:
 coordinates=hdlc \
 residues=
- then run
 module load chemshell/3.5.0
 chemsh.x cluster_n.chm
- follow the same steps as in the previous case
