Contact the HPC group (s.burbidge@ic.ac.uk, m.j.harvey@ic.ac.uk) and ask that your College account is activated on the HPC login node at login.cx1.hpc.ic.ac.uk
The start point is https://portal.hpc.imperial.ac.uk/ You should log into this using your college username (not the same as your email address).
From the menu on the left labelled Pools, Add Pool
Pool name = pqchem
Host = login.cx1.hpc.ic.ac.uk
User = the username you used above
Script path = /apps/scan-scripts/pqchem/
Click Add. You should get the response
Now download the key and add it to the ~username/.ssh/authorized_keys file on login.cx1.hpc.ic.ac.uk. Once this is done refresh the application list.
The downloaded key will have the name portalkey.rsa.pubkey
You will need to open this file with a text editor and copy the line inside, which looks like ssh-rss AAA....uxQ== apache@iccondor1.cc.ic.ac.uk to your clipboard
Now, using an sftp client, login to login.cx1.hpc.ic.ac.uk
A sub directory will show up as .ssh (you may need to convince your sftp client to show invisible directories, ie ones that start with a period)
This sub-directory contains the file authorized_keys
Open this file with your text editor (it might be empty) and paste in the clipboard, then save the file and quit.
At the bottom of this page, click on Refresh Application List
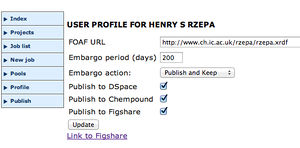
From the lhs menu, select profile and then tick the box Publish to HPC Data Repository and then the link Link to HPC Data repository.
The result of these operations will be that you can now submit jobs to the queue you have called pqchem and by publishing them to the HPC Data repository, assign a citable DOI to the calculation.
This identity will also be used as part of any submission to a digital repository
You should create a project in order to organise your jobs. Once a project has been created, you can then filter all your jobs by the project name from a pull-down menu
You can further filter jobs by specifying (case-sensitive) keywords, followed by pressing the continue button
Each job is assigned a Job ID (the column itself can be sorted by clicking on the heading). If technical problems arise, then you should include the JobID to help debug the error. If you click on the JobID itself, you can then re-assign any individual job to a different project.
The Application used to run the job. Two quantum codes are available, ORCA and Gaussian. The latter comes in various revision numbers and you can also select the number of processors to be used by the job and the amount of memory
Description. This is free-form text provided by yourself. Make it as memorable as you can (do not be lazy); the description will also be used as meta-data for deposition into a digital repository, so also ensure that the description is appropriate for public viewing.
Job status. Three values are commonly found: Pending (which means the queue has a backlog). If a job pends for more than a day you might want to check with the HPC team if there is a problem. Running and Finished are the others. If you see Failed then a technical problem has occurred and you definitely need to contact the HPC team.
You can recover any input file from a previous job. Useful to check what keywords were used etc.
Any of the final outputs can be selected and downloaded here. The most useful are the Log file, which contains most (not all) of the program results, and in particular will list any errors that may have occurred during calculation. You will have to inspect these errors using a text editor once downloaded (NotePad++ on Windows is particularly good for this). You can also attempt to open the log file using Gaussview (if a Gaussian calculation was run). Some properties such as wavefunctions for computing orbitals and other surfaces are NOT present in the log file and instead the Formatted Checkpoint file should be used for this purpose. If you want to do a QTAIM post-processing you should download the Wavefunction characteristics file (this is only written out if the appropriate keyword was included in the input file).
Delete the job. Only do this if you are sure you have no more need for it (it was a calculation with recognized errors, or it has been superseded etc). If it is a calculation which has failed, do not delete until you are certain you know how to deal with the error. Keep any successful jobs, although you may eventually need to delete older entries after eg the project has been fully published.
If you do have a successful job, you can publish it into a digital repository. Before you can publish you will have to configure your profile as shown below. Publication will return a doi (digital object identifier) which can be quoted in a subsequent publication, thesis, report, lecture notes, etc (just like an published article). To obtain the doi of the published entry, either click on one of Dspace or Figshare, or right click on the link and invoke copy link from the browser pull down menu that should appear. It will contain the string http://hdl.handle.net/10042/24721 and the sub-string hdl.handle.net is synonymous with dx.doi.org
the next three entries are for configuration. In Profile you can select which repository you wish to publish in. DSpace and Chempound need no configuration, but Figshare must be activated. To do so, click on the Figshare link and if you do not have one, create an account there Repeat once the account is up, and Allow UPortal to: create entries there on your behalf. The embargo section is not yet functional (and may in fact be implemented directly in Figshare in the near future).
Publish is a new section, still being developed, for publishing to a repository other types of data not generated by computation (NMR, MS, X-ray). More on this soon.
Pools shows what programs have been configured for your use. This configuration is done by the HPC team, and you should contact them in the first instance. If your pool status changes (i.e. a new program is added or a new version of a program is added) you will need to refresh your pool. Do this by clicking on View and at the bottom of the list of programs, click Refresh Application list. Any new programs will then appear in your list.
Job submission
You will need to prepare a Job input file on your local computer first. For Gaussian, this will normally be named job.com or job.gjf. If possible use the latter. The former should you ever wish to send it to someone, is quarantined by our email sytem here. There are two principle ways of creating an input
Use a pre-existing file (either from your own archive or from one someone may have sent you) and edit it using a text-editor, or indeed create one from scratch using that editor (only for the brave).
Use a program such as Gaussview (for Gaussian jobs).
Do not add any % directives (if a Gaussian job); the file should start directly with the keywords.
To submit the job, select New Job from the list on the lhs and from the pull down menu, select the job queue that has been set up for you. This might be Chemistry lab 1 if you are an undergraduate or PQChem(cx1) if you are from a research section. There are other queues, but you should contact the HPC unit to set these up.
You then continue to the next section, where you can select a program and a project (the project must be set up before you try to submit a job, using the Projects menu on the lhs).
You then select the pre-prepared input file and assiduously type in a Job description. Do not leave this blank!
Finally, press submit ...
And wait about 10 seconds before refreshing your browser window. If there are any syntactical mistakes in your input, the job will fail in the first ten seconds and you will need to correct them. If the job does fail, download the log file to find out why it failed, and then correct the input and resubmit.
If the job then starts running, you must be prepared to wait up to 72 hours for completion. If in fact the job requires more time, it will stop after 72 hours and you may need to restart it.
Job monitoring
Many jobs may last 72 (or 96) hours, and for jobs this long, it is often useful to monitor them. Very often a job will start to oscillate or other non-productive behaviour, and it is often best to put it out of its misery by Deleting it and re-running with perhaps keyword tweaks. The procedure for inspecting a running job is however not trivial.
Get an sftp client installed on your computer, and configure it to connect to login.cx1.hpc.ic.ac.uk
Set the initial path for your client to something like /work/rzepa/run
Separate directories named after the JobID should be seen.
Enter the one you want and inspect the output-0 file. You may find it useful to use the edit feature of your sftp client, which should be configured to open a text editor (for example, on a Mac, a suitable client is Fetch and a suitable editor is BBedit).
Scroll down to the bottom of output-0 and see what is happening
Or, save output-0 to local disk, rename it job.log or some such and
Open this file in Gaussview, making sure you select the tick box Read intermediate geometries in the file dialog.
This will then allow you to inspect each frame of eg an optimisation, and check for any anomalous behaviours.
Job errors
The above procedure can also be used to inspect more obscure errors. These will be present in error files in the work directory for the job, and can often provide information missing from the job output-o file itself.
Detecting and solving errors
There are many errors possible in a typical Gaussian or ORCA job; too many to list here. But as people encounter them, and their solutions, they may wish to briefly document the error and its fix on these pages for the general good. --Rzepa 11:17, 14 June 2013 (BST)
The publish button
This is used for publishing data other than that deriving from a calculation. The essence is that you can get a doi allocated for your data set here, and then quote this doi in subsequent reports, publications, theses, or to collaborators. This part of the system is evolving into a proper data-publishing resource, using a new repository called Figshare. The main features of this are intended to be:
You can publish either a single document (a dataset) or a collection of documents (a fileset) and have it allocated a doi.
This doi and the documents can be set to be either private or public. If the former, only you and members of a private collaborating group will be able to access the dataset or fileset
It will become possible to convert a private to a public set using the Figshare site as part of this project. This could be managed directly by yourself, or it could be flagged as an operation to be conducted by the publisher of any article submitted and accepted for publication which may rely on the data you have published in Figshare, on the date that the article itself goes public.
To keep the process of publishing a dataset or fileset as simple as possible, it has been set up to require a bare minimum of information
Where possible this information (meta-data) will be gathered automatically. For example, fields such as your identity, the date of the deposition and program keywords used (if a calculation) will be done for you.
If a calculation, further metadata such as eg a title (which in fact derives from a computed molecular formula) and an InChI string which is computed from the molecular connection table are also added.
If however the data relates to a molecule subjected to eg NMR, MS or X-ray analysis, you may have to provide a second file to allow this molecular meta data to be derived. This can be a simple ChemDraw file containing the molecular connectivity in 2D
If a non-computational file, you must also add an informative description. This is free-form, but it should contain information useful not only to yourself (experiment number etc) but to others as well. It may also contain eg systematic names of your molecule.
There is also a category pull-down (which matches the entries at Figshare's site). We would anticipate extending this as per user demand.
Once the file(s) are uploaded with their metadata a doi is assigned. By default using this section, it will be private.
Procedure
Before your first attempt to publish, the following preliminary setup should be complete.
Before you start, go to Figshare and create an account there. Remain logged in.
Now go to the Publish portal and select Profile. There check the Publish to Figshare box and update
Then click on Link to Figshare. On the page that appears, allow UPORTAL to publish to Figshare (this assumes you were still logged into Figshare).
The previous actions were all 1-offs. You are now ready to regularly publish.
Use the Projects menu to create an appropriate project. The name you choose will also be propagated to Figshare, so be concise, and do not use spaces in the project name.
Create a Chemdraw .cdx file for your molecule; one molecule only. This will be used to generate an inChI key as metadata (hence, no schemes or reactions at this stage)
Now invoke the Publish item. Enter the name of the molecule as the Title, and any experimental procedure you wish to use in the Description.
As the first uploaded file, attach the chemdraw (saved as .cdx).
You can now add as many further files as you wish. These can be e.g. NMR, MS, IR, UV, ECD, VCD, X-Ray files.
The anticipated format for such files is PDF. But if you wish to also add the raw data files (Bruker, etc) it will not reject them.
Finally, click submit. The process should not take more than 1 minute.
The portal page should refresh to show one line per published entry, with a Job ID at the left, and a link to Figshare deposition on the right
Click on the Figshare entry, and it will fail. This is because at this stage, the Figshare entry is private and cannot be seen externally.
To view the entry, you will have to return to the Figshare site, when it should appear under My data. Here you can edit it, and one of the editing actions is to make it public.
You can also edit this entry to add further files, to add further authors, to add further tags etc. Check that one of the tags is the InChI identifier. This should have been generated from the ChemDraw file you would have uploaded.
If you have made an entry public, you can still add new files and replace existing files with new versions. This will keep the assigned doi, but will create a new version with an updated data stamp.
At Figshare, you can also obtain the doi of the deposition. You can also obtain the same doi by clicking on the Figshare link in the submission portal.
Publish errors
The publishing of a calculation involves automated collection of meta-data. This is predicated on that data being present in the log file of the calculation. If the calculation has instead thrown up errors, the meta-data may be absent, and under these conditions, the publish may fail. If you do get a failure, check that the log file for the job you are trying to publish contains no errors.
If the log file appears error free, then another cause of publish errors may be that the combination of keywords used for the calculation is too complex for the meta-data parser to succeed. It is mostly possible to force success using a script called fix_mets, but running this script is less obvious. You will need to create a ssh session using an ssh-aware terminal program, and this needs to establish a connection as per:
ssh userid@login.cx1.hpc.ic.ac.uk
cd $WORK/run
cd Job_ID
../fix_mets
Some preliminary configuration may be needed to get the above working correctly; contact the HPC team for further advice.
FAQs and other useful hints
IOP(3/32=2)
Program does not check the eigenvalues of the overlap matrix looking for linear dependencies via small eigenvalues. Means that the mismatch such as shown below is prevented
Number of basis functions                  I              277
Number of independent functions            I              274
Flags that the input cartesian coordinates are in units of Bohr rather than Angstrom. Used when other programs write out such coordinates (for example QTAIM).
You should log in using your Imperial College Credentials
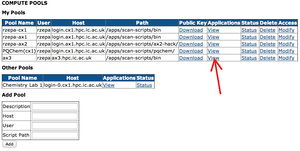
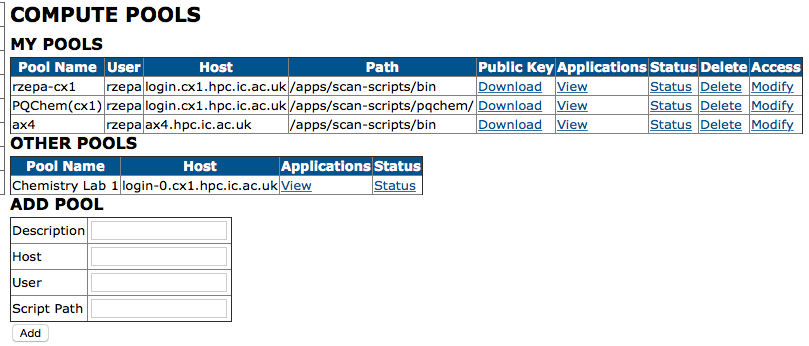
Your first task is to configure some pools for yourself. Click on Pools
The available pools and the programs defined for each pool are summarised in the image below. You can replicate the entries for any desired pool in the ADD POOL menu below and then click on Add
For any new pool entry, download the Public Key.
ssh to login.cx1.hpc.ic.ac.uk using your own login credentials.
cd .ssh
Using your favourite unix editor, copy and paste the contents of the public key on to the end of the file authorized_keys (or instead you can sftp to the same host, and edit the file using your preferred editor).
logout
Back on the Portal "Pool" page, locate the pool, click applications - view and then refresh application list