Please feel free to share your 'tips and tricks' here. Often what is routine for some is completely unknown to others. What follows is predominantly for OS X 10.5 (Leopard), but many tips may well apply equally well to earlier systems.--Rzepa 09:48, 29 November 2007 (UTC)
A useful site for interconverting Wiki dialects is here. If you find/run another flavour of Wiki (this one is MediaWiki, the same as Wikipedia) it is quite simple to convert using this resource.
Spotlight is the Mac OS X search engine. It can be enhanced with specific plugins. One very useful one for anyone dealing with molecular information is ChemSpotlight
After running the installer, check that the existence of the file <<your user name>>/library/workflows/applications/Finder/Reindex Selected Items.workflow.
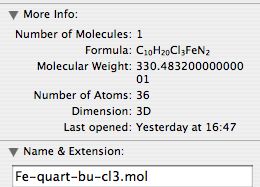
Chemical Spotlight Chemical SpotlightTo reindex a folder, select it, and press the Ctrl key to bring up a contextual items menu. Select the reindex item in Automator. Reindexing will occur automatically overnite anyway. The plugin works by scanning your hard disk for files likely to have chemical content, and passing that content to a program which derives fields such as the molecular formula, molecular weight, etc. The values of these fields can then be searched for. They are also displayed if you perform a Get Info operation on the individual file.
Once reindexed, you an use Spotlight to search for chemical terms.
Mac Specifications from Serial Number
Enter serial number here. To get the serial number, go to the Apple menu (top lhs), select About this Mac,
and request More Info. If you ever need the MAC address, you can get this from here as well. An alternative (non-Apple) site is said to be more reliable: Click here
Also available is a Warranty number determined from the serial number
The Mac Supporters Site
This site contains much information collected by about 400 UK Mac Supporters over decades!
Associating files on Web Sites with Using Safari on OS X
When one encounters a hyperlinked file on a web site, most browsers (e.g. Firefox) can automatically download and open that file (the first time by asking you which application you want to associate with the file, and subsequently by remembering your answer). The Mac Safari browser does not do this; it simply downloads the file, leaving you to grapple with opening it. To some extent, this problem can be alleviated by configuring OS X to handle the file appropriately. A useful preference pane to enable this can be downloaded here. This is particularly useful to use in conjunction with eg the departmental SCAN portal, where various output files are presented in a web page for further processing. You can configure either the MIME type (offered by the Web server), or the file extension to be associated with the application of your choice. The file will be downloaded ready to be clicked upon. It does not appear possible to open it automatically, this apparently being a security policy imposed by Apple.
Cooling a Mac Laptop
smcfancontrol is a useful utility that allows your fan speed to be increased (albeit at the
expense of the battery charge duration).
Improving Java Performance
Java Preferences
The default memory allocation to a Java applet on both Windows and OS X is 96 Mbyte. Some applets such as Jmol can easily consume this, especially if rendering a large window, or a complex surface. When the applet reaches the memory limit, it has to start the process of garbage collection and memory swapping, which slow it down, and in extreme can make it quite unstable, prone to crashing etc. If you have lots of memory on your computer, you can easily increase the default On OS X, find a folder /applications/utilities/java/J2SE 5.0 and open Java Preferences.app. The display should look like the display on the right. In the runtime parameters, type -Xmx512M and save. This allocates 512Mbytes (select your own value according to how much RAM your machine has). Restart your browser, whereupon you may well notice remarkably improved performance and stability. Update:NewJava
CHMOD calculator
What 755 means
Ever wonder why chmod 755 is so useful? What exactly does it set the permissions to? chmod calculator will let you compute any value. SuperGetInfo is a useful utility for setting permissions.
Modifying the OS X Dock in Leopard
Dock Delight changes the diffuse spot indicating a program is running to a more visible triangle. TinkerTool allows the transluscent glass behaviour of the new Dock to be reset to the original appearance.
Symantec Liveupdate
The standard Tiger Liveupdate no longer works with Leopard. Before you can update your virus definitions, you will have to download the latest Liveupdate from the Symantec site.
Only for the truly paranoid: Little Snitch and WireShark
Whilst a firewall protects external sites from probing your computer, the reverse is quite different. Little Snitch 2 (for Leopard) tells you when your computer is calling to the outside world. It comes as something of a revelation to realise that lots of such calls are in fact made silently, only Little Snitch can tell you about these. Using it reveals that per day, your computer may well contact some external sites perhaps up to 200 times! As I said, not for the paranoid. Wireshark is a packet sniffer that allows you to inspect the contents of IP packets emerging from your computer and going out.
Time Machine
Time Machine (TM) is new to OS X 10.5 (Leopard). It presents a minimal interface to regularly backing up files which change. Some people find TM works perfectly and is stable over long periods. Others are having issues. What follows below are personal experiences in using this back up system.
TM Instabilities
TM can be made to back up to either an external drive (connected by eg Firewire) or an internal (SATA) drive. Using the latter, TM does an incremental backup every hour. When its running, the Devices/Time Machine display shows a little activity cursor. With an internal SATA, you should hear copious disk activity. If the activity cursor is active, but nothing is heard, you may have a problem. When this happened to me, I found that it was no longer possible to launch any new application from the Dock. Its Icon would bounce (about 20 times) and then stop. The application did not start, but it did spawn a process. Attempts to kill this process using Force-Quit failed. A restart request also failed, largely because these processes could not be stopped by the system. A full power down restart was needed. Turning TM off stopped these occurances, which strongly implicated it. A possible solution was found when I ran Norton Antivirus (see here). It reported that around 10 files were unreadable on the file system due to corruption (it was not merely a permissions problem). Deleting these files, and restarting TM appears to have resulted in no unexplained stalls (for 3 days, but in truth only time will tell). --Rzepa 09:56, 3 December 2007 (UTC)
Update to above. It might be a coincidence, but every time TM has stalled, Parallels has been running. There have been no stalls with Parallels off.--Rzepa 07:22, 6 December 2007 (UTC)
TM Quirks / Issues
OS X Leopard (10.5.x) Time Machine issues.
Time Machine requires a Hard Disk - either connected directly via firewire cable to the host machine or via a 10.5 Server or via an internal (SATA) bay. Time Machine will NOT run unless the disk is capable of storing at least the contents of the system hard disk completely, although the backups themselves do appear to be compressed (which accounts for the relatively slow speed for the backups compared to other commercial systems).
When first run, Time Machine creates a complete copy of the system and then while the disk remains connected creates hourly (see below for changing this interval) backups for the first 24 hours. After 24 hours these are merged to create a "day backup" and a new set of hourly backups commences. After 7 days all daily changes are merged to create a weekly backup and new daily backups are created.
A number of Time Machine issues have been reported both in College and "in the wild".
A common issue is where the machine name has "special characters" such as - or _ in it. This can cause Time Machine to stall. This can be resolved by opening the Sharing preferences and updating the sharing name.
A new issue reported on http://www.macintouch.com/readerreports/leopard/topic4685.html by Mitch Sefton concerns file permissions and search abilities. In this instance it would appear that the machine did not correctly set up the administrator accounts - however it is a potential gotcha and one to look out for.
Basic article about NFS on Leopard. Note in particular the -P advanced parameter, which allows the correct port to be used in the NFS mount. This is part of the new autoFS system implemented by Leopard. If the Mac is properly bound to the AD domain, and you log in using this mechanism, the NFS mounts should appear with no issue.
Mac Eudora users
The latest version of Eudora Mailbox cleaner is useful to migrate
from Eudora to eg Apple Mail (which in Leopard is improved, faster, etc). But be aware that if Eudora contains a corrupted mailbox (which may not show up in Eudora), Mailbox cleaner may bomb out. If the corrupt mailbox can be identified and deleted, then you stand a pretty good chance of migrating successfully.
Disk repair and other checks on startup
If the startup process on boot does not complete (it hangs somewhere), the recommended procedure is to see if the system can be booted in safe mode. This involves pressing command-S whilst pressing the power on key. The only interface presented to the user if the system does boot is a terminal command line mode, and you have to know what you are doing thereafter. A rather better interface can be installed at this point called Applejack. This allows various checks to be performed in sequence, and it even has an expert (x) mode for more elaborate checks.
Controlling System and user Daemons
Lingon is an effective user interface for controlling all those invisible processes that occur behind the scenes.
Symantec Antivirus
A script for removing symantec antivirus is found here. It is useful for eg Snow Leopard users who are getting errors from old versions of the installed utility.
Downloaded file warning
defaults write com.apple.LaunchServices LSQuarantine -bool NO or
To convert a track to MP3 format, import the track into iTunes. Then follow the instructions here. Basically, the un-obvious thing to do is to set the import option in iTunes to the MP3 Encoder (when importing a CD). Then, when you click on Advanced in the top menu bar, an option to export any track selection to MP3 will appear. If you reset the preference to importing into AAC Encoding, this reverts the export option to AAC.
Fast H.264 encoding which makes use of multi-core processors (unlike iTunes/Quicktime Player which uses only one) is found here.
defaults write com.apple.Safari TargetedClicksCreateTabs -bool true makes new windows open as a tab instead
Hardware Tricks
To restore the firmware on a machine where a firmware update has failed, see here
Virtualisation
Collected here are various tips and tricks associated with running eg Windows virtualized under OS X on Intel computers.
Re-installing the Mac OS
OS X comprises > 140,000 system files. Whilst the integrity of some can be verified using tools such as DiskWarrior 4.1, some can simply get corrupted. This corruption manifests in many ways. Often the only way to recover your system stability is to re-install it. Although doing this is a great deal easier than any Windows/Linux user would have to face, it is still fraught with pitfalls. Here, some tips and hints are collected.
An archive and install will preserve both the applications previously installed and the user's files. However, an application can sometimes be installed in one of two ways. (a) For all users on the machine (b) for just one user. the former category can sometimes cause problems, such as
Most frequently, the license key will have to be located (often easier said than done) and re-entered. For example, a badly behaved application is Snapz Pro, which invariable requires relicensing.
Parallels clearly installs files into the system folder, which is replaced by a system re-install. You will find you may have to reinstall this application fully. Fortunately, its license key is held elsewhere and it does not need reinstalling.
Norton 10 anti-virus is notorious. The V 10 installer dates from 2005, and it installs the LiveUpdate V 3.5. Unfortunately this version of Liveupdate can no longer update live! Before Norton 10 can be fully re-installed, a separate download of LiveUpdate 4.04 is needed to ensure that the virus definitions are fully up to date (the current re-install has definitions that date to 2005!)
Backing up/Restoring a Bootcamp partition
Bootcamp has several oddities, in particular that only one partition can be present on ANY mounted disk, and that the bootcamp disk can only comprise four partitions, the first two being Mac, and the LAST (4th) being the Windows system disk. If the HD contains further partitions, Bootcamp may (will?) not function properly. This means that the partition structure of the HD has to be recreated to back up the entire system. Proceed as follows
Run Apple Bootcamp utility to create a bootcamp partition on your hard drive. Selecting 32 Gbytes is fine for most purposes.
Install Windows on the Win partition. If you think you might want to resize this partition in the future, select NTFS rather than FAT32.
Make sure you then shutdown Windows properly. This ensures the file system is properly closed and valid, before attempting a clone. It might even be worth defragmenting the Windows partition before attempting the clone!
Run Winclone pointing it to your existing newly built Bootcamp partition, and save the resulting image file to your OS X hard drive somewhere. It should end up around 16 Gbytes in size (if built as a 32Gbyte partition as above) and the process will take around 20 minutes. If you have installed other drivers onto your Bootcamp (e.g. Parallels) you might wish to consider an option for removing these before cloning (Parallels offers such an option). They can always be re-installed later if needed. This means that the cloned image can be used for other purposes, ie other virtualization programs, or pure Bootcamp dual boot.
This is saved on a Mac drive as a .dmg file, and can be mounted if needed so that files can be copied from it.
Insert a brand new hard drive into your system and format it as a single Mac partition using Disk Utility.
Run Bootcamp utility (part of the Leopard OS X install), and format the new HD partition as a dual partition, selecting 32 Gbytes for the bootcamp partition. Exit the utility instead of proceeding to install windows on this new partition.
Quit all the programs, and wait for the various partitions to mount (or to be really safe, reboot at this stage).
Run Winclone in restore mode, pointing to the Winclone image as the source, and the new bootcamp partition as the destination. It should reload your bootcamp, taking around 12 minutes to do so. If you formatted as NTFS, and your new Windows partition is larger than 32 Gbyte, the restore will expand the Windows partition to the new size. If your Windows format was FAT32, it will shrink the new partition down to the size of the restore partition. Tools exist (convert) to convert FAT32 to NTFS.
MAC address in ParallelsIf you have restored your Bootcamp Windows partition onto different hardware from that it was originally built on, some drivers may not be compatible. Its best at this stage, once you have rebooted into the newly restored Win partition, to re-run AppleBootcamp 2.1 to re-install the appropriate Bootcamp drivers for your new hardware.
You will also need to change the SID of your new image so that it does not conflict with the originally cloned system.
If you update your virtualization software which runs the Bootcamp partition (e.g. Parallels 3 to 4), you will probably generate a brand new MAC address. To reset the MAC address to a previously registered value, invoke the advanced settings for the Network adaptor.
Run carbon-copy-cloner to clone any existing OS X onto the OS X partition of your new HD.
You should end up with an exact duplicate of your original HD. This entire procedure is especially useful if the HD on an original Bootcamp install fails, or a machine fails, or if you buy a new system you wish to migrate to.
Special issues for Parallels/Bootcamp Virtualisations
Viewing additional system info at the Login window which were available in 10.6 but removed in clean install of 10.7. Click on the top right hand corner clock for details.