Title=Mod:inorganic wiki page instructions
‘How to create a wiki’ wiki
This page should provide you with all the necessary information required to put together a wiki page.
Getting started
Start up firefox goto the URL www.ch.ic.ac.uk, this will default to https://wiki.ch.ic.ac.uk/wiki/index.php?title=Main_Page
You should see something like this:
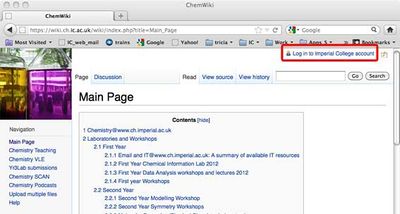
You need to login to your imperial college account before you can make changes to the wiki (login by clicking on the link outlined in red)
Once logged in to generate a page you only have to define it! So in the URL box delete just the current page's title and then add in your own
for example title=Mod:XYZ1234
where the Mod indicates this is a report associated with the modelling course, and XYZ1234 is your secret password for the report.
Make sure you choose something unique! Remember there are approximately 160 other people also doing a wiki, and that is just this year's students!
You should end up with a wiki page with a url of the following form
wiki.ch.ic.ac.uk/wiki/index.php?title=Mod:XYZ1234
(do not copy and paste the link above as some people have been getting an error when they do this)
It should tell you there is no text in this page. If an already existing page comes up, just try another more unique password. Here I used the title Mod:Ttestpage
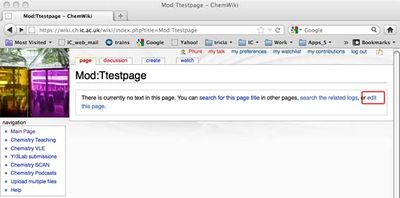
You should now click on the "edit this page"or the "create source" link to start, see the red box on the image above.
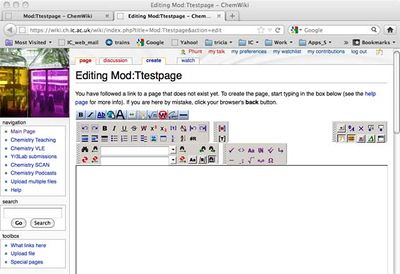
Sections, headings and table of contents
Sections and subsections are introduced by headings. These headings help to break up text, organise content, and populate the table of contents.
| Description | What you type | What it looks like |
|---|---|---|
| Heading Formatting |
== Section Title == |
Section title
Subtitle
Sub-subtitle
|
Your page should be divided into sections, using the section heading syntax above. For each page with more than three section headings, a table of contents (TOC) is automatically generated which will make navigating your page easier.
Subscripts, superscripts and styles
In the table below you will find a list of the most common formatting styles which you will need to use in your own wiki page:
| Description | What you type | What it looks like |
|---|---|---|
| Formatting | ||
<b>bold</b> or '''bold''' |
bold | |
<i>italic</i> or ''italic'' |
italic | |
<u>underline</u> |
underline | |
<b><i>bold and italic</i></b> or '''''bold & italic''''' |
bold and italic | |
| Subscripts | x<sub>1</sub> x<sub>2</sub> x<sub>3</sub> |
x1 x2 x3 |
| Superscripts | x<sup>1</sup> x<sup>2</sup> x<sup>3</sup> |
x1 x2 x3 |
| You can also format titles: | ||
| Heading Formatting | ===<u>Subtitle</u>=== |
Subtitle
|
It does not matter which code you use to format your text although stick with one style and use it throughout in order to avoid confusion.
Links
To add a link give the URL within a set of square brackets, the displayed link goes after a "vertical bar" as follows:
[[name of page| text to display]]
For more detailed instructions for your wiki writing go to the comp chem lab page.
If you want to add a DOI link click.
Uploading files
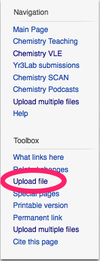
The first step in using an image or other file is to upload it to the suitably named “Upload file” page. You can reach this page by clicking the link on the left hand side of your wiki page as illustrated below.
Select the file you wish to upload by clicking browse and navigating to the location of the file.

Scroll to the bottom of the Upload page and click upload file.
Important!
You must upload your finished .log files, and link to them on your wiki. The .log file will then also be used to create a moving jmol image. How to do these will be explained below.
If you upload a file with the same name as a previously uploaded file that file will be lost! So please name your files including your username, for example: rr1210_nh3.log.
Embedding an image on your wiki
Once you have uploaded a file, you can incorporate it into your wiki page by selecting the picture button (![]() ) in the wiki toolbar.
) in the wiki toolbar.
This will add the following text:
[[File:]]
In order to embed your image into the wiki page simply write the name of the file after the colon. For example:
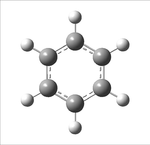
[[File:Benzene_3D.png]]
will appear as shown below on your wiki page.
Resizing images
Sometimes when you embed an image you have uploaded, such as a Gaussview picture or a screenshot you have taken, the image can be rather large. You can manipulate the image size displayed on screen by adding a pipe (vertical bar) after the picture file extention then a number followed by px:
[[File:Benzene_3D.png|150px]]
The number dictates the width of the image and 'px' stands for pixels therefore the image would as follows:
This technique is particularly useful if you want to embed images in a table.
Thumbs and captions
Some images may be too large for your wiki page but the clarity may be poor when resized. Pictures such as MO diagrams may be too large (in dimension and file size) to embed directly on your page as they would result in slow loading. Instead you can add a thumbnail of the image along with a caption describing the picture which will link to the upload file. To do this you need to add a pipe followed by the word thumb (for thumbnail) followed by another pipe and the corresponding caption text terminated with a full stop. See below for an example
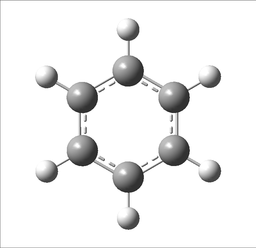
[[File:Benzene_3D.png|thumb|A Gaussview image of an optimised benzene molecule.]]
The image will appear on your wiki page as follows:

Clicking the thumb nail will take you to the uploaded file page for the image.
Repositioning images
The default position for an embedded image is to the left hand side of the wiki page however if you would prefer to center the graphic then add a pipe and the text center after the file name.
[[File:Benzene_3D.png|thumb|center|A Gaussview image of an optimised benzene molecule.]]
This will appear as follows on your wiki page:

You can search the web for more options on how to format images in a wiki.
Adding Jmol files of your molecule
create your file
First years: Upload your .log file as explained above for image files. Now you can continue to the How to add the jmol to your wiki section.
Later years: If you have run a large job, then there are two options to avoid uploading the large .log file directly to the wiki. One is to use gaussview to save a copy of your molecule as a .mol file or to make a .xyz file.
upload your file
Now upload your file to the wiki
Go to your wiki-page, click on "upload file" in the column on the left
follow the local instructions
copy the file-name generated into the script below
How to add the jmol to your wiki
You can have the jmol embedded directly into your wiki page, please don't do this more than 5 times on one page as it may become slow to load.
- add the following text to your wiki page replacing "username_molecule_1.log" with your file name.
<jmol><jmolApplet>
  <title>test molecule</title>
  <color>black</color>
  <size>200</size>
  <uploadedFileContents>username_molecule_1.log</uploadedFileContents>
</jmolApplet></jmol>
- this will produce the following:
test molecule |
- the title tag is self explanatory
- the colour tag sets the background colour to black
- the size tag sets the size of the jmol image to display
- the uploadfile tag determines the file to load
Note: log files from optimizations will show by default the starting un-optimized structure. You can right-click on the JSmol applet and under the menu item "model" you will find all the structures present in the file. To make the optimize structure be the one show when the wiki is opened, you should add to the code above, somewhere between the tags <jmolApplet> and </jmaolApplet>, a line with:
<script>frame x.y</script>
where x.y are the numbers defining the frame of the optimized structure.
More complex jmol activities such as adding vibrations and MOs can be found here:advanced jmol
Beware! You can corrupt your wiki by not putting the correct XML for the jmol in, recovering from such errors is difficult! Save your wiki before inserting any jmol molecules, and be careful that you put in the text exactly as it is here.
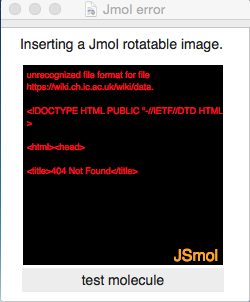
There is a common error when inserting a Jmol image. Using the above method a black box will appear with red writing within it. Shown below.
The error occurs because the file is not on the system. The file not being on the system is either because is has not been uploaded, or the file name is different.
Beware! underscores often become spaces so check carefully as your file name might well have changed!
The file name "klw14_molecule.log" will become "klw14 molecule.log" once uploaded to the wiki.
You can check you have uploaded the file or check the file name of your upload by clicking on the LIST OF UPLOADED FILES link at the top of the upload home page and search the uploaded files using your username.
using a mol file
- open your molecule in gaussview
- choose save
- in the options choose save as a mol file
- here is what gaussview saved for my file:
Title Card Required

Created by GaussView 4.1.2
  4  3  0  0  0  0  0  0  0  0  0    0
    0.0000    0.0000    0.0000 B   0  0  0  0  0  0  0  0  0  0  0  0
    0.0000    1.1945    0.0000 H   0  0  0  0  0  0  0  0  0  0  0  0
    1.0345   -0.5973    0.0000 H   0  0  0  0  0  0  0  0  0  0  0  0
   -1.0345   -0.5973    0.0000 H   0  0  0  0  0  0  0  0  0  0  0  0
  1  2  1  0  0  0  0
  1  3  1  0  0  0  0
  1  4  1  0  0  0  0
making an xyz file
- you need to make this file yourself in a text editor, this file has 3 sections
- first line: number of atoms in the molecule
- second line: comments or title
- following lines: atomic symbol followed by xyz coordiantes
- here is my file:
- you need to make this file yourself in a text editor, this file has 3 sections
BH3 molecule
 B    0.00000000    0.00000000    0.00000000
 H    0.00000000    1.19452732    0.00000000
 H    1.03449101   -0.59726366    0.00000000
 H   -1.03449101   -0.59726366    0.00000000
More on backing up and fixing your report after a crash can be found here:
fixing wiki problems.
Adding a link to a Gaussian job file
How to add a reference to a D-space file (Not for the first year lab)
just add DOI:10042/to-xyz where xyz is the entry generated by the publish operation into the digital repository
How to load a file that you ran on your laptop or desktop (First years use this option!)
only use this option sparingly as you will fill up the available space on the server
you should only submit pre-optimised jobs this way, that is run the optimisation to get the optimised geometry and then run a second optimisation that runs for only one step. OR only jobs that you have been explicitly told to run on your laptop. This will limit the size of the submitted file.
First years: your file size is small enough don't worry.
choose to "Upload file" (similar to the process for images!)
select the file on your computer
when the file has loaded at the top of the window it will say something like:
your_file_name.out (file size: XXX KB, MIME type: unknown/unknown)
then go to your wiki page and add something like this:
The optimisation file is liked to [[Media:Hunt_bh3_321g_opt.log| here]]
which looks like this:
The optimisation file is liked to here
Tables
Tables may at first appear complicated particularly if you have limited wiki or HTML experience however the following guide should provide you with a suitable foundation to build upon.
A basic table
To automatically insert a table, click or (Insert a table) on the edit toolbar. If "Insert a table" is not on the toolbar follow these directions to add it.
The following text is inserted when Insert a table is clicked:
{| class="wikitable" border="1"
|+ caption
! heading !! heading
|-
| cell || cell
|-
| cell || cell
|}
By clicking ‘Preview’ you will see that the table code above will appear as follows on the wiki page:
| heading | heading |
|---|---|
| cell | cell |
| cell | cell |
If we have a closer look at the table code you will gain a better idea of what is going on.
The entire table code is flanked by curly brackets and a pipe (vertical bar). The table begins with {| and is terminated using|}. These must be written on their own lines as follows:
{|
table code goes here
|}
In order to give the table a suitable title, the entry beginning with a vertical bar and plus sign "|+" should be used followed by your table heading textand the caption after it:
{|
|+ caption
  table code goes here
|}
Additional rows can be added by typing a vertical bar and a hyphen on its own line: "|-".
{|
|+ The table's caption
|-
  row code goes here
|-
  next row code goes here
|}
Following the |- entry, cells in the corresponding row can be separated with either a new line and a single bar for each cell in that row or by a double bar "||" on the same line. See the table code below as an example.
{|
|+ The table's caption
|-
|Cell 1 || Cell 2 || Cell 3
|-
|Cell A
|Cell B
|Cell C
|}
It does not matter how you split the cells in row so long as you are consistent in order to avoid confusion. The table code above will be displayed as follows on your wiki page:
| Cell 1 | Cell 2 | Cell 3 |
| Cell A | Cell B | Cell C |
As you can see in the table above, the desired effect is the same in both cases.
A more complicated table
Below is the table code for a slightly more complicated table than above
{| class="wikitable" border="1"
|+ caption
|-
! colspan="3" style="text-align: left;"|Information
|-
| colspan="3" align="center"|[[File:Benzene_3D.png|256px]]
|-
! colspan="3" style="text-align: left;"|More Info
|-
| style="text-align: center;"|Column 1
| style="text-align: center;"|Column 2
| style="text-align: center;"|Column 3
|-
| rowspan="2" | A
| colspan="2" style="text-align: center;"| B
|-
| C <!-- column 1 occupied by cell A -->
| D
|-
|
| rowspan="2" colspan="2" style="text-align: center;" | E
|-
| F <!-- column 2+3 occupied by cell E -->
|-
| colspan="3" style="text-align: center;" | G
|}
The table will appear as follows:
| Information | ||
|---|---|---|
| ||
| More Info | ||
| Column 1 | Column 2 | Column 3 |
| A | B | |
| C | D | |
| E | ||
| F | ||
| G | ||
Lets have a look at some of the different commands here:
- Colspan and rowspan relate to the how many columns and rows the cell spans respectively.
- Style=”text-align: center” dictates the postioning of the text in the cell. Center can be changed for left or right depending on your preference.
- Notice that should you wish to position the image in a particular fashion then the code is slightly different to that for text:
align=”center”
- If you require a blank cell then you can use:
References
References can be added as shown in the table below:
| What you type | What it looks like |
|---|---|
The quick brown fox jumps over the lazy dog.<ref name="LazyDog" /> <references> <ref name="LazyDog">This is the lazy dog reference.</ref> </references> |
The quick brown fox jumps over the lazy dog.[1]
|
