Mod:Hunt Research Group/hpc Directory on desktop
To mount your HPC directory to your machine you need to be connected to College network. If you are not on campus, you should use openVPN (other VPN program will not allow you to mount the directory).
Mounting your HPC directories on a Mac
Use the supplied Mac functionality
1. Click on a finder window.
2. Click the "Go" heading at the top of your screen.
3. Select the last item "connect to server".
4. Enter the server address smb://rds.imperial.ac.uk/RDS/user/username and substitute username with your own (e.g. zx616).
5. Click the "connect" button.
6. A new window should pop up. Choose "Connect as registered user" and enter your college credentials.
7. Now you should be connected to the HPC and you directory should show up under "Locations" in a Finder window.
8. Repeat steps 1-3 and click the "+" to add this server to your list of favourite servers.
From inside the college
follow the instructions in the "Accessing data from your personal computer" section link
You can use the command line interface to mount the disk
create a file in your bin directory, for example "load_cx1"
inside this file have:
#!/bin/bash
#
sshfs username@login.cx1.hpc.ic.ac.uk:/rds/general/user/username/home ~/Mount/cx1 -o volname=cx1
replace username with your login create a directory in your home directory called Mount/cx1 this will connect your cx1 directory to the directory "Mount/cx1" when this works the directory image changes to a little "disk" symbol
run the command from a terminal as "load_cx1"
if you get errors related to cannot find the server etc, set-up a public-private key pair, then try again
You can also try 3rd party software the following is mostly historical
Each drive/connection you mount creates a persistant connection between your computer and the HPC login server. And if you open too many connections, this could cause a lot of unhappy people in HPC if you forget to unmount these connections.
To unmount your drive, simply right click on the desktop icon and "Eject" the virtual drive.
One option is MountainDuck but I have found it unstable and it hangs a lot (really I mean all the time) https://mountainduck.io
Another option is OSXFUSE from http://osxfuse.github.io
- When you install check “MacFuse Compatibility Layer” otherwise it will not work
Using OSXFUSE if your OS is post-Sierra
The security options are much tighter and unfortunately MacFusion (see below) will not work
Download and install the SSHFS module (available from the FUSE for OS X page).
Create a folder on your Mac to use as a mount point, since I'm going to mount a directory from the computer XX, I've made a directory called XX
mkdir /User/Tricia/Mount/XX"
Then type something like the following
sshfs tricia@XX.ch.ic.ac.uk:/Users/tricia/Work ~/Mount/XX
where the command is very like ssh
- tricia is my login account
- XX.ch.ic.ac.uk is the remote computers name
- "/Users/tricia/Work" is the directory I want to mount from the remote computer
- a simple "/" mounts the whole disk!
- ~/Mount/XX is the path to the directory I just made, this is where the directory will be mounted
What will appear is a directory replacing XX with "OSXFUSE Volume 0 (sshfs)"
You can unmount the disk by using "command E" ie eject disk
If you get connect errors, set up a public-private key pair and try again.
Using OSXFUSE if your OS is pre-Sierra
download MacFusion from http://macfusionapp.org
Using Macfusion:
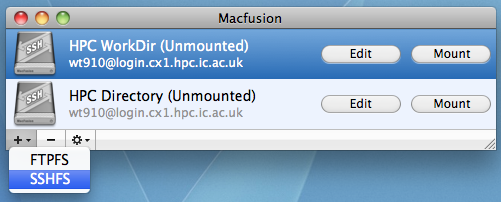
1. Open Macfusion.app (in your ~/Applications folder)
2. To add a connection, click on the "+" button on the bottom left and select "SSHFS"
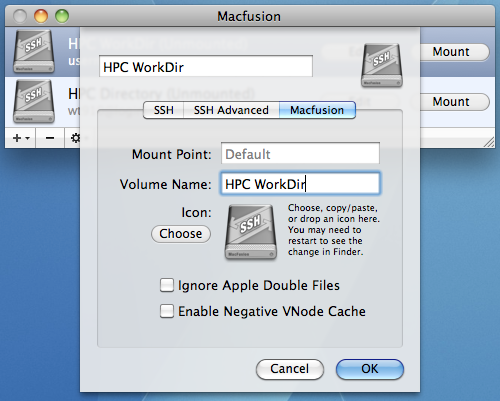
3. Enter the information required for your login
4. Keep the remaining settings as their default
5. Macfusion will mount each connection as a virtual drive. To change the name of the mounted drive, select the "Macfusion" tab and enter your desired name into "Volume Name:"
6. Click OK and you should see your newly added connection in the main window. Select the "Mount" option to mount your drive.
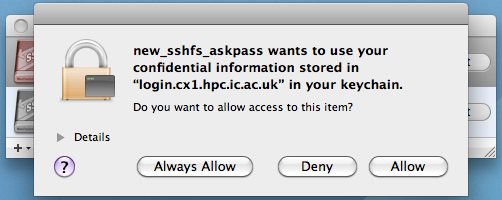
7. On your first attempt to mount the drive, MacFusion will ask for permission to access your password. Click "Always Allow" to avoid seeing this popup on subsequent connections.
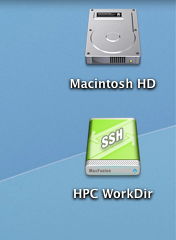
8. When the drive is successfully mounted, it should turn green with the option to unmount it.
9. You can access your drive via the icon on your desktop.
Mounting your HPC directories on a Windows 10 computer
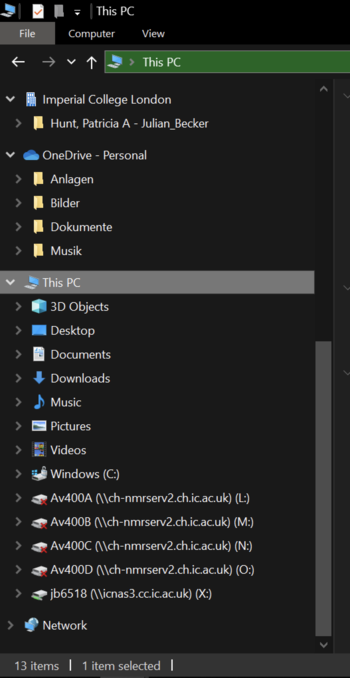
1. Open an Explorer window by right clicking the Windows symbol and choosing the option "File Explorer".
2. Click on "This Computer" on the left hand-side.
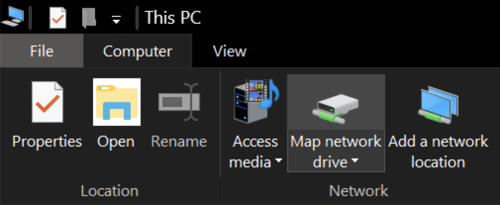
3. Click "Computer" on the upper left side.
4. Click "Map network drive".
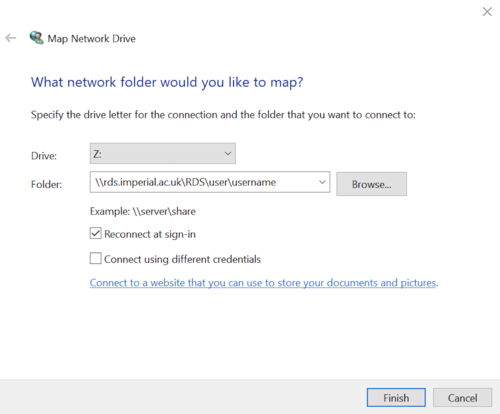
5. A new window should open. Choose a letter associated to your new network drive, and enter the server address as: \\rds.imperial.ac.uk\RDS\user\username. Change username to your college login name.
6. Click "Finish". A new window will ask you for your credentials. Enter your college login name in the format "ic\username" and your password, tick the "Remember my credentials" box and click "OK".
7. The HPC directory is now mounted to your computer and can be found under "This PC" in an Explorer window.

