Mod:Hunt Research Group/geomview
Using GaussView 6 to view salvation cavities
Instead of using GeomView to view solvation cavities, GaussView 6 is able to do the same. If you don't have GaussView 6 installed on your machine, you can run GaussView 6 directly on the HPC.
Run your smd calculation as usual and open the .chk file with GaussView6. Click "Results/PCM Solvation Cavity..." Two new windows will open; one conatingin the visualisation o the solvation cavity and another one to set the visualisation parameters.
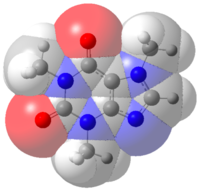
To get a nice picture of the solvation cavity do the following: Untick the "Show Points" option and tick "Show Solid" instead. Under the Coloraturas option tick the "Colour By Atom" box and reduce the value of the "Solid Opacity" until you are happy with the picture. Here is an example of the solvation cavity of caffeine:
Using GeomView to view solvation cavities
GeomView is a visualisation software which can be used to view the cavities constructed using the PCM model in Gaussian.
Installing GeomView
Information about GeomView and installation information can be obtained from the website http://www.geomview.org/.
MacPorts method
If you use MacPorts as your package manager then GeomView is available directly by the command:
port install geomview
MacPorts installs new packages by default in /opt/local and so GeomView will be installed here unless you have specified otherwise. If you aren't sure what package manager you use then try the above. If it fails because you don't have MacPorts installed then you can find out more information and install it from their website [1], or ask someone else in the group who might be able to help!
Download and Build method
The other option for installing GeomView is to download the source code (follow the most recent links for the newest build version from the website link above) and to configure and make it yourself.
Before you build/install GeomView a few things are required first:
- Either Motif, OpenMotif or LessTif are required. It is unlikely that you will already have one of these installed. Motif is now available as open source software and is an updated version of OpenMotif. More information can be found on the website and I would recommend this over the no longer developed LessTif. If you use HomeBrew as your package manager you can install it by
brew install openmotif. If you use MacPorts as your package manager then what are you doing reading this? Go to the method above and install geomview directly. - Make sure you have XCode installed for the gcc C compiler and necessary libraries.
- Make sure X11 is installed (for OpenGL and more libraries).
Once these dependancies are installed then GeomView can be built. You can download the latest version of the source code from the SourceForge or by the link from the website above.
Download the latest version of the GeomView source code and unpack the contents using the tar command:
tar -xf geomview_version.tar
Note: If it's a tar.gz then an additional -z argument will have to be used to decompress using gzip.
Useful configure instructions are given in the INSTALL.Geomview file contained within the Geomview folder and the necessary part is under the Platform Specific notes for Mac OS X.
First run the command:
export LDFLAGS="-dylib_file /System/Library/Frameworks/OpenGL.framework/Versions/A/Libraries/libGL.dylib:/System/Library/Frameworks/OpenGL.framework/Versions/A/Libraries/libGL.dylib"
Then configure the file:
./configure --with-opengl=/usr/X11 --with-htmlbrowser=open --with-pdfviewer=open
If any errors arise with open gl (e.g. can't find <GL/gl.h>) then double check the location of your GL files as it may be different from /usr/X11, in which case alter the above line accordingly.
It may also be necessary to include an additional argument here to specify where your motif files can be found.
Installation through HomeBrew should mean that they are in an expected location (/usr/local). If you do get an error however, then add the final argument:
--with-motif=/your/motif/path
to the line above. Where /your/motif/path is the location of openmotif/motif on your system.
Once configured then execute the commands:
make
make install
At the end of this process you will have an executable for GeomView which can be run.
Generating the solvation cavity
To generate the files needed to view the cavity within GeomView additional PCM arguments need to be added to the input section of your job. The 'read' keyword needs to be included as an option into your SCRF input to introduce an additional PCM input section. This PCM input section follows the molecular specification section and here you want to include the keyword 'GeomView'.
Inclusion of the GeomView keyword produces the two files: points.off and charge.off which show the points of the discretised surface and the corresponding charge distribution on this surface.
Tesserae, which display the discretised cavity surface clearer in GeomView, might be visually preferred to the points generated. Selection of tesserae can be done by including a second keyword 'tsare=0.2' which sets the area of each tesserae. Including this argument results in the outpoint of the two files: tesserae.off and charges.off instead. However, it should be noted that including this argument changes the algorithms used for the calculation and so results will be different.
Limited information about these inputs can be found on the Gaussian SCRF keyword page under the PCM Parameters heading and the GeomView keyword is at the bottom of the page.
Example input for a job would be:
#P M062X/6-311G(d,p) SCRF(SMD, Read, ...) SCF(Conver=9) Int(Grid=UltraFine)

Job title

0 1
Molecular specification

GeomView
(optional: tsare=0.2)
To access the two files produced at the end of the calculation then you may need to use an edited run/gf script which will copy the two *.off files back in to the directory from where the job was submitted. This can either be achieved by:
- If using a standard runscript then after the line which copies over the .chk file add the line:
cp $TMPDIR/*.off /$PBS_O_WORKDIR/.
- If using the gf runscript, then the following section of code can be included into your associated runscript (again after the line which copies the .chk file across):
 if [[ -e $TMPDIR/tesserae.off ]]
  then
    cp $TMPDIR/tesserae.off /$PBS_O_WORKDIR/${in%.com}_tesserae.off
  fi
  if [[ -e $TMPDIR/charge.off ]]
  then
    cp $TMPDIR/charge.off /$PBS_O_WORKDIR/${in%.com}_charge.off
  fi
  if [[ -e $TMPDIR/points.off ]]
  then
    cp $TMPDIR/points.off /$PBS_O_WORKDIR/${in%.com}_points.off
  fi
This will then copy the produced files across if produced by the calculation.
Viewing the cavity with GeomView
Locate the directory where GeomView was installed and run the program by typing 'geomview' into the shell. After a short time three windows should appear. These are the main centre menu, the tools menu and a blank camera window.
GeomView treats both loaded files and cameras as 'Targets' and these show on the left hand side list in the main centre menu. To open the .off files you simply click File and Open from the main centre menu and navigate to the local directory which contains the files from the file browser which appears.
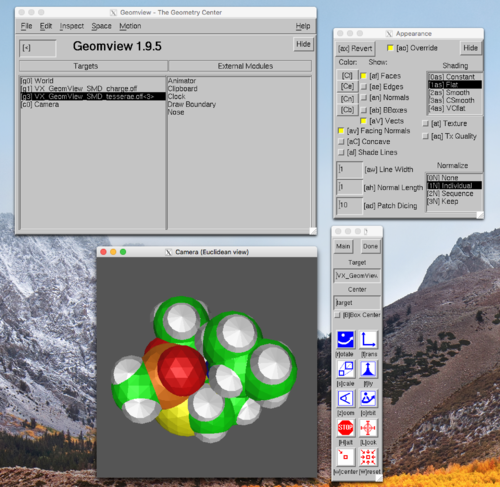
Opening the files adds them to the list of targets and they will also appear in the open camera window. Multiple files can be added to the targets and will initially all stack in the same camera window. Individual files can be viewed by toggling the 'Show: [af] Faces' on and off between the open files from the Appearance tool kit window. (Located from: Inspect; Appearance [Pa]). The target which is highlighted is the active one and changing any options in the toolkits or interacting with the camera with the mouse will affect this target only.
The above screenshots show the point charges of the cavity surface on the left and the cavity surface itself on the right. The motion, appearance and centre menu are also visible. The active target is highlighted black and the other target has been hidden by unchecking the box by [af] Faces (yellow highlight means selection).


