Podcast in this sense refers to an audio podcast, enhanced with artwork and links to web sites. It does not refer to video podcasts, which require quite different equipment and techniques.
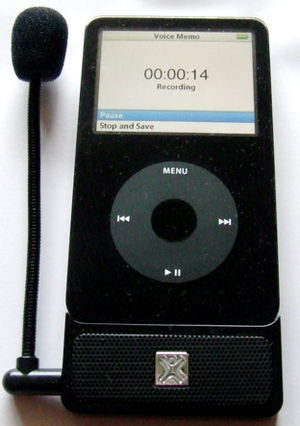
iPod and MicromemoVoice MemosYou will need a voice recorder. The easiest route I have found is to use a Video iPod, equipped with a suitable recorder. The MicroMemo from Xtreme Accessories docks with the iPod, and has a small attached microphone. The entire assembly can fit into e.g. a shirt pocket. A Separate lapel or tie microphone can also be attached.
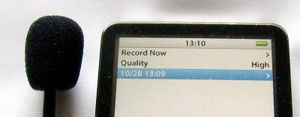
When the Micromemo is plugged in, from the Top menu of the iPod, navigate down as follows: Extras/Voice Memos/Record Now/Record
To start, press the circular button in the middle of the iPod. To pause/Stop, press again. A large timer appears in the video screen indicating the recording time.
A list of recorded items appears under Voice Memos, with date and time for each item. This can be played back (through earphones) or through a built-in speaker. The playback is toggled using the (only) button on the front of the Micromemo unit.
Transferring to iTunes
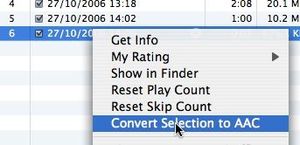
How the recording manifests in iTunesConverting to AAC formatViewing the AAC encoded file in your music libraryUnplug the Micromemo unit from the iPod and plug the latter into a Computer, to fire up iTunes.
The recording shows up in the Voice Memos playlist. Highlight this and control click (or right mouse click) on it to get a popup menu, from which is selected Convert Selection to AAC. Invoking this reduces the size of the recorded file by a factor of about 10, from 10 Mbytes per minute to around 1 Mbyte per minute.
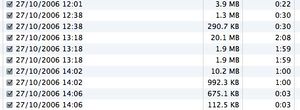
Go to the Library/Music area of iTunes. At the bottom the original audio file and the compressed AAC version should be seen, with a size ratio of about 10:1.
Transferring from iTunes to a Podcast Folder
Drag-n-drop the AAC file to a new Podcast folder on your computer. The file name extension should manifest as .m4a. If it ends in .wav, its the original format, which you do not want.
If you want to enhance your podcast with visual and hyperlink content, go to the next section.
If you do not want any further enhancement of this file, it is in fact ready to be mounted as an audio Podcast. In the first instance, contact Henry Rzepa to have it mounted.
Enhancing a Podcast
1:Starting a podcast in Podcast maker2:Adding an Episode
3:Adding a Chapter4:Publishing to a serverYou will need a program such as PodCast Maker.
Open Podcast maker. Firstly, in the general preferences, change the setting to deconstrain the maximum size of 600 pixels (or set a larger size of say 1200 pixels). This ensures that the artwork displayed in e.g. iTunes has sufficient resolution to e.g. display chemical structures with no loss of detail.
Select New Podcast. Populate the various fields, including some artwork in the Drag-n-Drop Image box and the .m4a file created using the iPod into the Drag-n-Drop Episode window.
When you do the latter, the display changes to a new panel which shows an item called Chapters. Select this, and click on the Enhanced Podcast box.
You now have a slider bar, with which you can listen to various parts of the audio track. With the slide at the start, drag-n-drop an initial image or artwork to be present when the podcast first starts playing. In the Link field, past any URL you might wish to associate with the overall podcast. For example the podcast which explains these notes has a link http://www.ch.ic.ac.uk/wiki/index.php/IT:podcasting.
The time should show as 00:00. Move the slider to an appropriate point in the audio track and then click on +. This adds a second chapter, which can have its own artwork, its own Link and its own timepoint. Do this as many times as are appropriate.
When you are finished, save the entire production. Re-opening it will enable you to continue from the point you left off.
Finally, click on Publish. Instructions on how to configure the server will be provided by Henry Rzepa. That should be it!
As the podcast plays, it initially displays in the Artwork box of eg iTunes, the initial splash screen, and any link you have provided. As it proceeds, new artwork will replace the old, according to the time stamps you have it. The user can click on the Link at the bottom of the artwork to display the web page. They can of course stop, or fast-forward at any point, and the appropriate slide will be displayed.