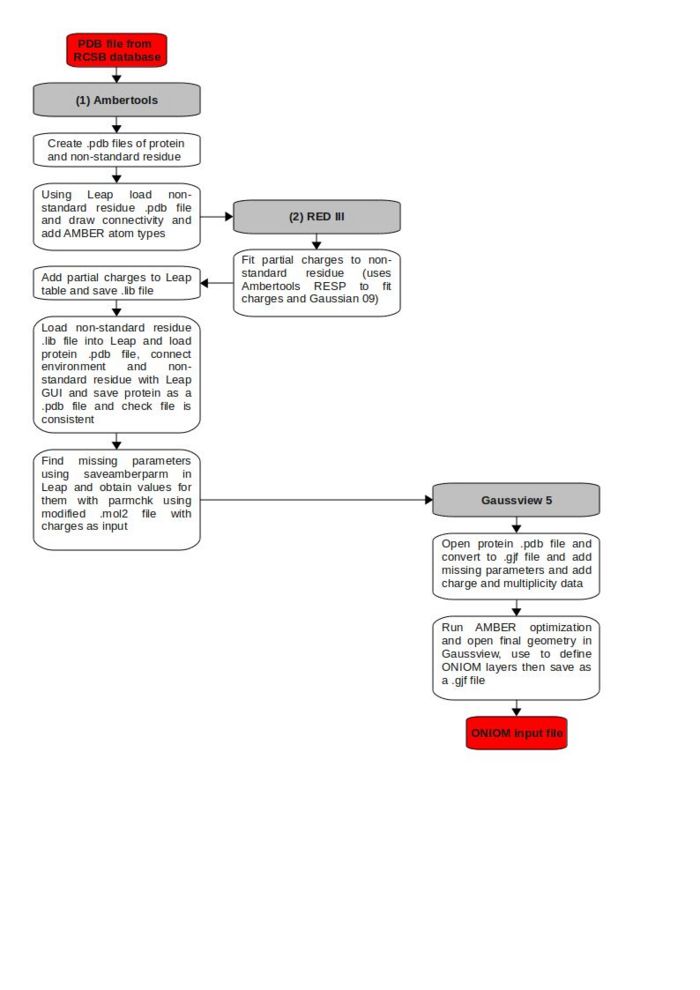
Guide to Creating ONIOM input files for biomolecules
Overview
This guide provides a step by step process to create ONIOM input files for biomolecules from a structure file in the Protein Data Bank. Emphasis will be placed on the use of AMBER as the low level method and how to obtain parameters for any non-standard residues.
Creating Standarized .pdb Files
The first step is to select a .pdb file from the Protein Data Bank that is of high enough resolution to allow atomistic calculations to be produced. The relevant data for determining this is shown on the right hand side under experimental details. The two values to look at are the Resolution[Å] and R-Value, which both should be as low as possible. Having determined a suitable structure, download the suitable test pdb file (usually found in the download files drop-down menu in the top right corner).
In Gaussview select File→Open and choose options. Change the drop-down box "Add Hydrogens:" to No and, if you wish to remove water molecules, check the box "Skip Water Molecules." When the file opens up there may be a number of secondary structures present labelled A, B, C etc. In general we require only one so any extras can be removed using Edit→PDB Secondary Structure... and deleting those which are not required. This was then saved as a .pdb file.
| The Secondary Structure Editor |
|---|
| An example of the secondary structure editor is shown below. If we were interested in obtaining structure A only then all that is required is to highlight chains B to D and Edit→Delete→Delete Selected Secondary Structures. The numbered residues such as Helix and Sheet that do not belong to A are automatically removed so if you remove these separately you may end up removing residues from the structure you wish to keep. |
Residue Names and Protonation States
Within the .pdb file the fourth column corresponds to the residue name. This name will be used to define the protonation state of the residue, which is currently specified as a default value. In order to determine the protonation state it is possible to use either PROPKA or H++. Once the protonation states have been determined the residue names can be changed to reflect this. (Note: Parameters for non-standard residues calculated later may be included to improve the accuracy).
Chromophore Structure
Now a standardized .pdb file of the whole protein has been created the next step is to obtain a .pdb file of the non-standard residue. To do this open the .pdb file we have just saved using a text editor such as vim and remove all lines that are not atoms from the region we intend to include in this residue. It is important here to consider exactly what this consists of here as any problems at this stage are normally not highlighted until much later in the process and will require returning to this point. The region specified here is not the same as that of the ONIOM model region or even the protein chromophore, it is simply so that non-standard residues are defined in the AMBER program. The two important points are that this region must:
- Include the non-standard residue that requires parameterization.
- Is connected to the rest of the protein through standard N or C amino terminations.
The second point may require some elaboration. Some non-standard residues are a modified standard residue, such as that in PYP which is a cystine residue with p-coumaric acid group on the sulphur instead of a thiol. It is tempting to specify the chromophore as just the p-coumaric acid group, however, this causes problems later in defining the parameters for the cystine residue and so the cystine group must also be included in the chromophore region. This joins to the rest of the protein through standard amino acid N and C bonds and so this is all that is needs to be included.
This structure is then saved as a .pdb file and opened in Gaussview. Hydrogens were then added to the residue except where the residue will join to the protein structure. Again be sure of the protonation at this stage as any mistakes will require returning to this point. Check particularly the multiplicity is correct. Save this as a .pdb file and inspect it to ensure that the newly added hydrogens have the same pdb residue name and number as the other atoms, and that their atom numbers follow on and are consistent with connectivity. Also remove any extra TER lines other than the one at the bottom (if there is one). To ensure that this is absolutely correct it may be worth opening this in Gaussview and re-saving it, making sure the correct connectivity is shown.
Obtaining AMBER Library File of the Chromophore
We now have two .pdb files, one of the whole protein and one of the non-standard residue region. The next step is to create an AMBER library file of this non-standard residue. Leap, an AMBERTools program, will be used and this requires us to determine three pieces of information for the non-standard residue:
- Connectivity
- AMBER atom types
- Partial charges
Leap can be opened using the command:
xleap -s -f /apps/ambertools/amber11/dat/leap/cmd/leaprc.ff03 &
This command will use the leap.ff03 set of parameters although any other AMBER parameters could be used depending on the system under study. If this doesn't do anything you probably need to load ambertools:
moduleload ambertools
Having opened Leap the non-standard residue .pdb file can be loaded using:
variable = loadpdb filename
where variable is any name you choose and the full pathname must be specified in the filename. Now type:
edit variable
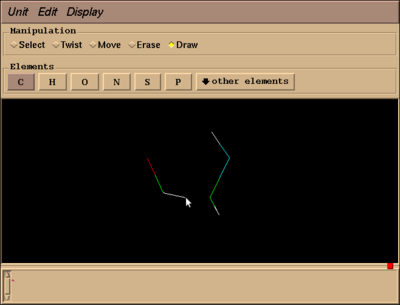
This brings up a gui where the residue can be visualized. Ensure all atoms are selected and go to Edit→Edit Selected Atoms. This provides a table to be filled with the information specified above. The way to obtain these values will now be explained. A quick sidenote, do not close any Leap x-windows, other than using File→Quit as this will cause the program to crash and any unsaved information to be lost.
Connectivity
This is simply achieved by selecting the draw checkbox in the Leap GUI tool and drawing bonds between the atom centres as desired.
AMBER Atom Types
In order to obtain these open the non-standard residue .pdb file with Gaussview and add methyl groups to the atoms which were previously left with free valences. Save this structure as a .pdb file as we will need it later, however, at this point we only need to go to Edit→Atom List and look at AMBER Type. Copy these across to the Leap table using the PDB Atom Name column to match up Atoms.
Partial Charges
This is the most complicated process and requires the use of [R.E.D.-III.4 tools]. This first uses the modified .pdb file with added methyls to obtain a Gaussian input file using the following command:
perl $DIR1/Ante_Red.pl $DIR2/modified_non_standard_residue_file.pdb >> $DIR3/output.txt
where $DIR is the relevant pathname. The resulting Gaussian input file can then be run (remember to change memory requirements and checkpoint file locations before submitting). After this has completed the frequency portion was deleted from the log file (this could be removed from the input but is useful for ensuring a minima is obtained) and the log file was copied to Mol_red1.log file in the RED-III directory, ensuring that the filename remains Mol_red1.log. Another file that was output from the above command was a .p2n file. This must be copied to Mol_red1.p2n in the same directory as before, also maintaining Mol_red1.p2n as the filename.
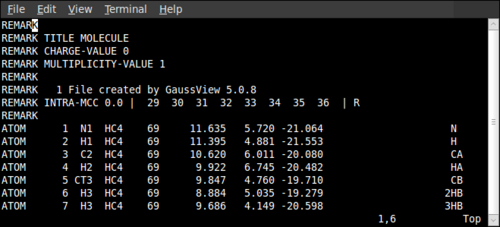
Moving to the RED-III directory now, open Mol_red1.p2n with a text editor and add the following line to exclude the methyl groups from the Partial Charge calculation:
REMARK INTRA-MCC 0.0 | 29 30 31 32 33 34 35 36 | R
where the numbers correspond to the numbers of the atoms in the methyl groups of the modified non-standard residue. Note that there are two spaces between all the numbers. Below is an example of where it has been placed:
If necessary change the charge and multiplicity here. Having done this open RED-vIII.4.pl and go to line 4196. Change the variable $DIR to whatever you wish, this is where the output files will be saved to. Create the following jobscript file and run it, although change the directories on line 19 to something useful for you.
##################################################################
# REDTOOLS JOBSCRIPT                                             #
# CREATED 08/07/10                                               #
# LAST MODIFIED 08/07/10                                         #
# LEE THOMPSON                                                   #
##################################################################

#PBS -l ncpus=1
#PBS -l mem=1000mb
#PBS -l walltime=04:00:00
#PBS -joe

module load ambertools
module load gaussian
export GAUSS_SCRDIR=$TMPDIR
echo $GAUSS_SCRDIR
cd $(echo $PBS_O_WORKDIR)
pwd
perl /home/lmt09/SOFTWARE/RED-III.4-Tools-Files/RED-vIII.4.pl > /home/lmt09/PHD_Y2/PYP/1NWZ/PROTONATED/ONIOM/RED_out.log
Going into the new directory open Mol-m1-o1-sm.mol2 which contains the partial charges that we seek in the final column. To copy these to the Leap table requires a bit of detective work to match up the atoms. This can be done by opening up the Gaussian log file Mol_red1.log in Gaussview which is labelled in the same order as the .mol2 file with the partial charges. The Gaussview atoms and the atoms in the Leap GUI can then be matched by their positions. These atoms can then be matched to the Leap table by displaying atom names on the Leap GUI using Display→Names. This is also a good time to check consistency of atom types again as if they are different it will cause problems identifying parameters later on. It is also worth checking that the charges sum to an integer value and that you have typed them in correctly.
Having filled in the Leap table go to File→Save and Quit, and then exit the GUI using File→Close. Back at the command line prompt, save the library file using:
saveoff variable filename
where the variable is the same as used before and filename includes the full pathname. Now exit Leap and go to the .lib file that we have just created. In order for this to be recognised the filename must be uppercase and three or four letters long (although I have not tried to see otherwise). In order to achieve this move it from variable.lib to VAR.lib, where, VAR is a capitalized three letter word of your choice. Now open the file in vi and type:
:%s/variable/VAR/g
which changes all instances of variable to VAR. We have now created our library file for the non-standard residue.
| Justification of Partial Charge Model |
|---|
| The determination of partial charges is important for the successful use of force field methods, yet the concept of a partial charge is somewhat ambiguous, with several different methods for their determination (see Cramer, C.J., Essentials of Computational Chemistry, p309 for an introduction. The partial charges we use are computed using the restrained ESP method (Cornell et al, Journal of the American Chemical Society, 1995, 117, 19, 5179-5197). This is an extension of the ESP method which determines partial charge q on atom k by minimizing the difference between:
and the Molecular Electrostatic Potential (MEP):
for all positions r. This is computed from a number of points spaced evenly around the Connolly surface of the molecule. ESP is dependent on conformation, however, causing hydrogens in a methyl group for example to have different partial charges. As these are all freely rotating in practice the same partial charges may used for each hydrogen and this is the extension that RESP applies to the ESP method (Bayly et al, The Journal of Physical Chemistry, 1993, 97, 40, 10269-10280). |
| The main purpose for using this is that AMBER uses RESP for its parm96 (Cornell) parameter set which is the same as that used by Gaussian (derived from HF/6-31G*). Reasons for its use in this force field are that it has been shown to be useful for modeling inter-molecular interactions at short to long range, is convergent with respect to the size of basis set used, resolves to an extent the problems of atoms which do not contribute the Connolly surface and so are ill-defined by the method, as well as having the original advantages of ESP over methods such as Mulliken and Löwdin charges. |
| RED (RESP and ESP charge Derive) tools is a series of perl scripts which generate a Gaussian input file which can be run and from which the partial charges derived (Dupradeau et al, Physical chemistry chemical physics: PCCP, 2010, 12, 28, 7821-39). |
Producing a Gaussian Input File
NOTE: It is now recommended to add hydrogens using PROPKA or H++ prior to loading into LEAP
Having constructed the library file of the non-standard residue we must now construct a .com or .gjf file to run in Gaussian. Initially this will simply be an AMBER calculation, the output of which will be used to determine if we have all the correct parameters and as a starting geometry for the ONIOM calculations. The first step is to reopen Leap using the same command as before. now load in the AMBER library file for the non standard residue using the command:
loadoff $DIR/VAR.lib
where again $DIR represents the pathname of the file. Typing list in Leap will display all the library files that have been loaded of which VAR should be one of them. The next stage is to load the .pdb file of the protein that we obtained from Gaussview previously using the command for loading .pdb files shown previously. This should add hydrogens to the structure in accordance to the library files and perhaps a terminal oxygen although never any other heavy atom (this is displayed at the command line). Opening the Leap GUI of the whole protein should reveal the non-standard residue highlighted in the full protein environment. The connection between the protein and the residue must now be determined. There are a number of ways to do this including at the command line but the most successful method so far is to simply draw the bonds in the Leap GUI.
Having drawn the connectivity, go to Unit→Calculate Net Charge to obtain the charge of the protein, which should be an integer. Close the Leap GUI and save the .pdb using the following command:
savepdb variable $DIR/filename.pdb
We will need the information we have loaded in Leap later so do not close it but for now, look at the .pdb file in the text editor and ensure that there is a terminal oxygen labelled <OXT> at the bottom of the file. If there is not insert ATOM 3608 OXT HIE 228 -1.012 21.725 100.791 1.00 0.00 in the correct place, although the cartesian coordinates, PDB residue name and number and atom number will be different from this example. Also bear in mind that if there are any waters below this then their atom numbers will need changing (use grep "WAT" filename1.pdb | awk '{ X=$2; Y=X+1; print "s/"X," "$3" /"Y," "$3" /" }' > sedscript | sed -f sedscript < filename1.pdb > filename2.pdb for this). Also check in the .pdb file that the atoms around the chromophore all are of the same residue and do not have differing residue numbers. If this is not the case then it means that the non-standard residue .pdb file was mixed up and you must return to that stage.
Now open the .pdb file in Gaussview and go to Edit→Atom List. Scan through this to ensure that all MM partial charges are present for all atoms other than those in the chromophore residue. If there are any that are not it is because the residue connectivity is wrong so use the bond specification tool to correct this in Gaussview and you should see the MM charges appear as soon as you correct the problem (Hint: The problem atoms will have undefined AMBER atom types (shown as ?) so look at connectivity around these atoms). The MM partial charges can be copied directly from Mol-m1-o1-sm.mol2 into the Gaussview atom list now, although I prefer a second option which I shall explain when I come to it. Now save this as a .com/.gjf file although, because of a bug in Gaussview which causes patial charges to be missing from the input file, you must save this using Calculate→Gaussian Calculation Setup, chose an AMBER calculation and insert the charge determined earlier and the multiplicity and submit. Select yes when prompted to save the file and then cancel the file execution. You should now have a Gaussian input file in your directory. If you have not inserted the MM partial charges previously copy them from Mol-m1-o1-sm.mol2 and paste them between the AMBER atom type and the PDB information in the Gaussian input file. All that we now require for a complete AMBER calculation is the AMBER parameters for the non-standard residue.
Getting Non-Standard AMBER Parameters
If we were to run the Gaussian input file as produced above we would get an error message indicating missing AMBER parameters. Gaussian uses parm96 by default and if any stretches, bends or torsions are present in the non-standard residue but not in the forcefield, then an error message is obtained. In order to obtain them we first need to know what parameters are missing. This can be achieved using:
saveamberparm variable xxx yyy
It doesn't matter if the file is the whole protein or just the non-standard residue as the missing parameters should be the same (this is a good check to ensure there are no problems round the corner). The Green Fluorescent Protein (GFP) non-standard residue for example produces the following output:
> saveamberparm csy xxx yyy
Checking Unit.
Building topology.
Building atom parameters.
Building bond parameters.
Could not find bond parameter for: CM - HC
Could not find bond parameter for: CC - N*
Could not find bond parameter for: CC - O
Could not find bond parameter for: CC - CM
Could not find bond parameter for: CC - CC
Could not find bond parameter for: CC - N*
Building angle parameters.
Could not find angle parameter: CM - C - OH
Could not find angle parameter: CA - C - CM
Could not find angle parameter: CA - CA - CM
Could not find angle parameter: CA - CM - HC
Could not find angle parameter: CM - CA - CM
Could not find angle parameter: CM - CA - CA
Could not find angle parameter: N3 - CT - H1
Could not find angle parameter: N* - CC - CT
Could not find angle parameter: N* - CT - C
Could not find angle parameter: O - CC - N*
Could not find angle parameter: CC - CC - CM
Could not find angle parameter: CC - N* - CT
Could not find angle parameter: CC - CM - CA
Could not find angle parameter: CC - CM - HC
Could not find angle parameter: CC - CC - N*
Could not find angle parameter: CC - CC - O
Could not find angle parameter: NB - CC - N*
Could not find angle parameter: NB - CC - CM
Could not find angle parameter: NB - CC - CC
Could not find angle parameter: CC - NB - CC
Could not find angle parameter: CC - N* - CC
Could not find angle parameter: CC - N* - CT
Could not find angle parameter: CC - CT - N3
Could not find angle parameter: CC - CT - H1
Building proper torsion parameters.
 ** No torsion terms for  CT-N*-CC-CT
 ** No torsion terms for  N*-CC-CC-CM
 ** No torsion terms for  O-CC-CC-CM
 ** No torsion terms for  O-CC-N*-CT
 ** No torsion terms for  CC-CC-CM-CA
 ** No torsion terms for  CC-CC-CM-HC
 ** No torsion terms for  CC-N*-CC-CT
 ** No torsion terms for  CC-CC-N*-CT
 ** No torsion terms for  NB-CC-N*-CC
 ** No torsion terms for  NB-CC-N*-CT
 ** No torsion terms for  NB-CC-CM-CA
 ** No torsion terms for  NB-CC-CM-HC
 ** No torsion terms for  NB-CC-CC-N*
 ** No torsion terms for  NB-CC-CC-O
 ** No torsion terms for  CC-N*-CC-CC
 ** No torsion terms for  CC-N*-CC-O
Building improper torsion parameters.
 total 4 improper torsions applied
Building H-Bond parameters.
Parameter file was not saved.
This must then be set up in the Gaussian input file, two lines after the connectivity, in the following style:
Bonds
| HrmStr1: Harmonic stretch I (Amber 1): |
|---|
| HrmStr1 Atom-type1 Atom-type2 ForceC
ForceC Force constant Equilibrium bond length |
Angles
| HrmBnd1: Harmonic bend (Amber 1): |
|---|
| HrmBnd1 Atom-type1 Atom-type2 Atom-type3 ForceC
ForceC Force constant () Equilibrium angle |
Torsions
| AmbTrs: Amber torsion (Amber 1): |
|---|
| AmbTrs Atom-type1 A-type2 A-type3 A-type4 PO1 PO2 PO3 PO4
PO1–PO4 Phase offsets for : these may be set to 0 or 180: in the former case, they have no effect, in the latter, they have the sole effect of switching the sign of the '+1' coefficient in front of cos. - magnitudes Number of paths. When zero or less, determined on-the-fly. |
Thus for the above example we would obtain a list that looks like:
HrmStr1 CM HC
HrmStr1 CC N*
HrmStr1 CC O
HrmStr1 CC CM
HrmStr1 CC CC
HrmBnd1 CM C  OH
HrmBnd1 CA C  CM
HrmBnd1 HC CM CA
HrmBnd1 CM CA CM
HrmBnd1 CM CA CA
HrmBnd1 H1 CT N3
HrmBnd1 N* CC CT
HrmBnd1 N* CT C
HrmBnd1 O  CC N*
HrmBnd1 CC CC CM
HrmBnd1 CC CM CA
HrmBnd1 CC CT N
HrmBnd1 CC CM HC
HrmBnd1 CC CC N*
HrmBnd1 CC CC O
HrmBnd1 NB CC N*
HrmBnd1 NB CC CM
HrmBnd1 NB CC CC
HrmBnd1 CC NB CC
HrmBnd1 CC N* CC
HrmBnd1 CC N* CT
HrmBnd1 CC CT N3
HrmBnd1 CC CT H1
AmbTrs CT N* CC CT
AmbTrs N* CC CC CM
AmbTrs O  CC CC CM
AmbTrs O  CC N* CT
AmbTrs CC CC CM CA
AmbTrs CC CC CM HC
AmbTrs CC N* CC CT
AmbTrs CC CC N* CT
AmbTrs NB CC N* CC
AmbTrs NB CC N* CT
AmbTrs NB CC CM CA
AmbTrs NB CC CM HC
AmbTrs NB CC CC N*
AmbTrs NB CC CC O
AmbTrs CC N* CC CC
AmbTrs CC N* CC O
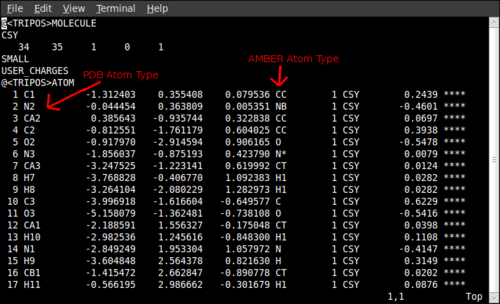
Now all that remains is to add the values to these parameters. To do this we go back to the files output when we ran the Redtools jobscript. Take the Mol-m1-o1-sm-mol2 file and open it in Gaussview. Change the PDB atom name and AMBER atom types of the .mol2 file in a text editor to those shown in the Gaussview atom list. This should be similar to the file below, obtained for GFP:
Now we have this file we can obtain the missing parameters from the General AMBER Force Field using:
parmchk -i Mol-m1-o1-sm.mol2 -f mol2 -o filename.frcmod
where filename can be whatever you chose. The output of this file should now contain all the parameters required for the non-standard residues and the labels for the AMBER atom types should correspond directly to those output by saveamberparm. For stretches and bends the numbers can be simply copied across, however, the torsions are a bit more complicated. An example of a torsion parameter from the .frcmod is shown below:
H1-CT-C -O    1    0.800         0.000          -1.000      same as hc-c3-c -o
H1-CT-C -O    1    0.080       180.000           3.000      same as hc-c3-c -o
Which must be put in the format
AmbTrs Atom-type1 A-type2 A-type3 A-type4 PO1 PO2 PO3 PO4
Here H1, CT, C and O are the atom types; is the second column; is the third column; POI is the fourth column; and the fifth column is the value of i/I. If there is a dash marker, this means that the next row is of the same torsion. The above example would translate then as:
AmbTrs H1 CT C O 0 0 180 0 0.8000 0.0000 0.0800 0.0000 1.0
We have now determined all the parameters for the AMBER calculation. In order to use them add amber=softfirst in the route section of the input file. A final point is that in the Gaussian input parameters, the atoms can be specified either way round (e.g. H1 CT C O or O C CT H1). These are equivalent and the input must be checked to ensure that each specification is unique, otherwise an error message will result. This happens even if the values are equal.
A example input file for GFP is shown here: Gaussian AMBER input for GFP
| Known Gaussian and Gaussview labelling problems |
|---|
| Hydroxyl protons are specified as HO in the AMBER atom types and in the parm96 force field parameters they have zero van der Waals radius. This results in Gaussian showing a warning that charged centres with zero van der Waals radii can collapse into a nearby oppositely charged centre, however, these centres should not have any radii associated with them. |
| Carbonyl oxygens are often specified as 'OM' in Gaussview, including any .com files it outputs. This is not recognized in any AMBER parameter sets, however, it is the same as 'O'. Any instances of 'OM' should be changed to 'O'. If this is not done the same problems of charged centres with no van der Waals radii as above occur. |
| The backbone nitrogens are often incorrectly labelled as 'N3', however, they should be labelled 'N'. |
| Aromatic carbon atoms are labelled 'CH', however, they should be 'CA'. |
Constructing the ONIOM input
We now have an Gaussian input file which will produce an AMBER calculation of the structure originally specified in the PDB database. This final section details how to progress from this point to an ONIOM input file. In order to check that everything is in order it may be worth running a single point AMBER calculation on the structure. This can be done using IOp(4/119=10) which will print out the force field parameters so that they can be checked. Providing there are no missing parameters this calculation should complete and an AMBER optimization can be carried out on this structure.
The converged AMBER structure can then be used to make the ONIOM file. A problem here is that there is no partial charge data upon opening the .log file in Gaussview, and the formatted checkpoint file loses all the PDB data. The easiest way to solve this then is to save the .log file as a .pdb file and then to open the .pdb file in Gaussview and save it as a .com file using Calculate→Gaussian Calculation Setup, although this will require re-entering the charges on the non-standard residue. Another option may be to use this script to add PDB data to the .com file obtained from the .fchk file. Although this is not necessary here, it is useful if you want to create an input with a geometry obtained from a calculation that used geom=check as the .log file loses all PDB data as well.
Whichever option you choose, open the file in Gaussview, specify the high level region using Edit→Edit Layer and then save as a .com file (using Calculate→Gaussian Calculation Setup as otherwise all MM charge data will be lost). The route section you use should look like this for mechanical embedding:
#p opt oniom(b3lyp/6-31g(d):amber=softfirst) geom=connectivity
or this for electronic embedding:
#p opt oniom(b3lyp/6-31g(d):amber=softfirst)=embed geom=connectivity
We now have a complete ONIOM input file: 1W7S_01_OPT_oniom_b3lyp_631gd_amber.gjf
If you try to run this calculation and get a missing parameter error, this is highly likely to be due to the fact that the parameters involving the link atoms are not present (these parameters could be obtained in the previous steps by using the actual model structure rather that the model without link atoms as done above and the above method should be modified to do this (perhaps using antechamber on a pdb file from Gaussview) in due course). If this happens, check that the missing parameters are not an indication of bad ONIOM partitioning (such as a link-atom replacing an electron-withdrawing group) and add the parameters by hand from the General AMBER Force Field parameter set (available from the AMBER website).
Summary
Back to ONIOM for biomolecules
